ProductivityTools is the Daylite extension by iOSXpert for more productivity in your daily work. It extends the right mouse button in Daylite with numerous useful functions that let you edit, duplicate, delegate, or send tasks, appointments, notes, and other records faster.
For an overview of the entire plugin, see the article What are the ProductivityTools? This article introduces all the right-click actions of the ProductivityTools in detail.
Table of contents
Setting Up the Context Menu
Tasks
- Configuring due dates and estimated duration
- Shifting the due date of tasks
- Calculating the sum of estimated duration for multiple tasks
- Numbering tasks
- Creating multi-tasks
- Converting a note into a task
Appointments
- Creating an appointment from a task
- Duplicating appointments
- Confirming appointments for other users (Calendar Assistant)
Batch Actions for Records
Additional Features
- Copying a table to the clipboard
- Sending tasks and appointments by email
- Running your own scripts with the Daylite Automator
Setting Up the Context Menu
How do I assign the right mouse button?
Many functions of the ProductivityTools can be assigned to the right mouse button so you can execute them quickly. In this video you will learn how to configure the contextual menu in Daylite.
To assign a function to the right mouse button, follow these steps:
- Navigate to Daylite -> Preferences -> Contextual menu
- Select the object on which you want to execute the function
- Simply drag the function to the desired position in the contextual menu
Tasks
Configuring due dates and estimated duration
The ProductivityTools allow you to adjust the due date and estimated duration of one or more tasks in a very convenient way using the contextual menu. Before you can use these functions with the right mouse button, you first need to configure the desired time intervals.
If you want to change due dates, proceed as follows:
- Navigate to Plugins -> ProductivityTools -> Settings
- In the Due Date tab, use the + button to add new entries or manage existing entries
- Right-click, choose the Set due date... function and select the desired entry
If you want to change the estimated duration, proceed as follows:
- Navigate to Plugins -> ProductivityTools -> Settings
- In the Estimated Time tab, use the + button to add new entries or manage existing entries
- Right-click, choose the Set estimated time... function and select the desired entry
Shifting the due date of tasks
To change the due dates of tasks, proceed as follows:
- Select one or more tasks whose due date you would like to shift
- Choose from the menu Plug-Ins -> ProductivityTools -> Set due date
- Click on the desired number of days to move the selected tasks. You can define your own time intervals under Set Due Date -> Preferences
If you use this function frequently and like to work with the right mouse button, you can configure the Set due date function for use in the context menu (see How do I assign the right mouse button?).
Calculating the sum of estimated duration for multiple tasks
This feature makes it possible to quickly determine the estimated time of several tasks. For example, you can quickly see the time required for a project.
| Note: An estimated time needs to be entered in the tasks beforehand (see Configuring due dates and estimated duration). |
To calculate the sum of the estimated duration of several selected tasks or projects, proceed as follows:
- Select the desired tasks
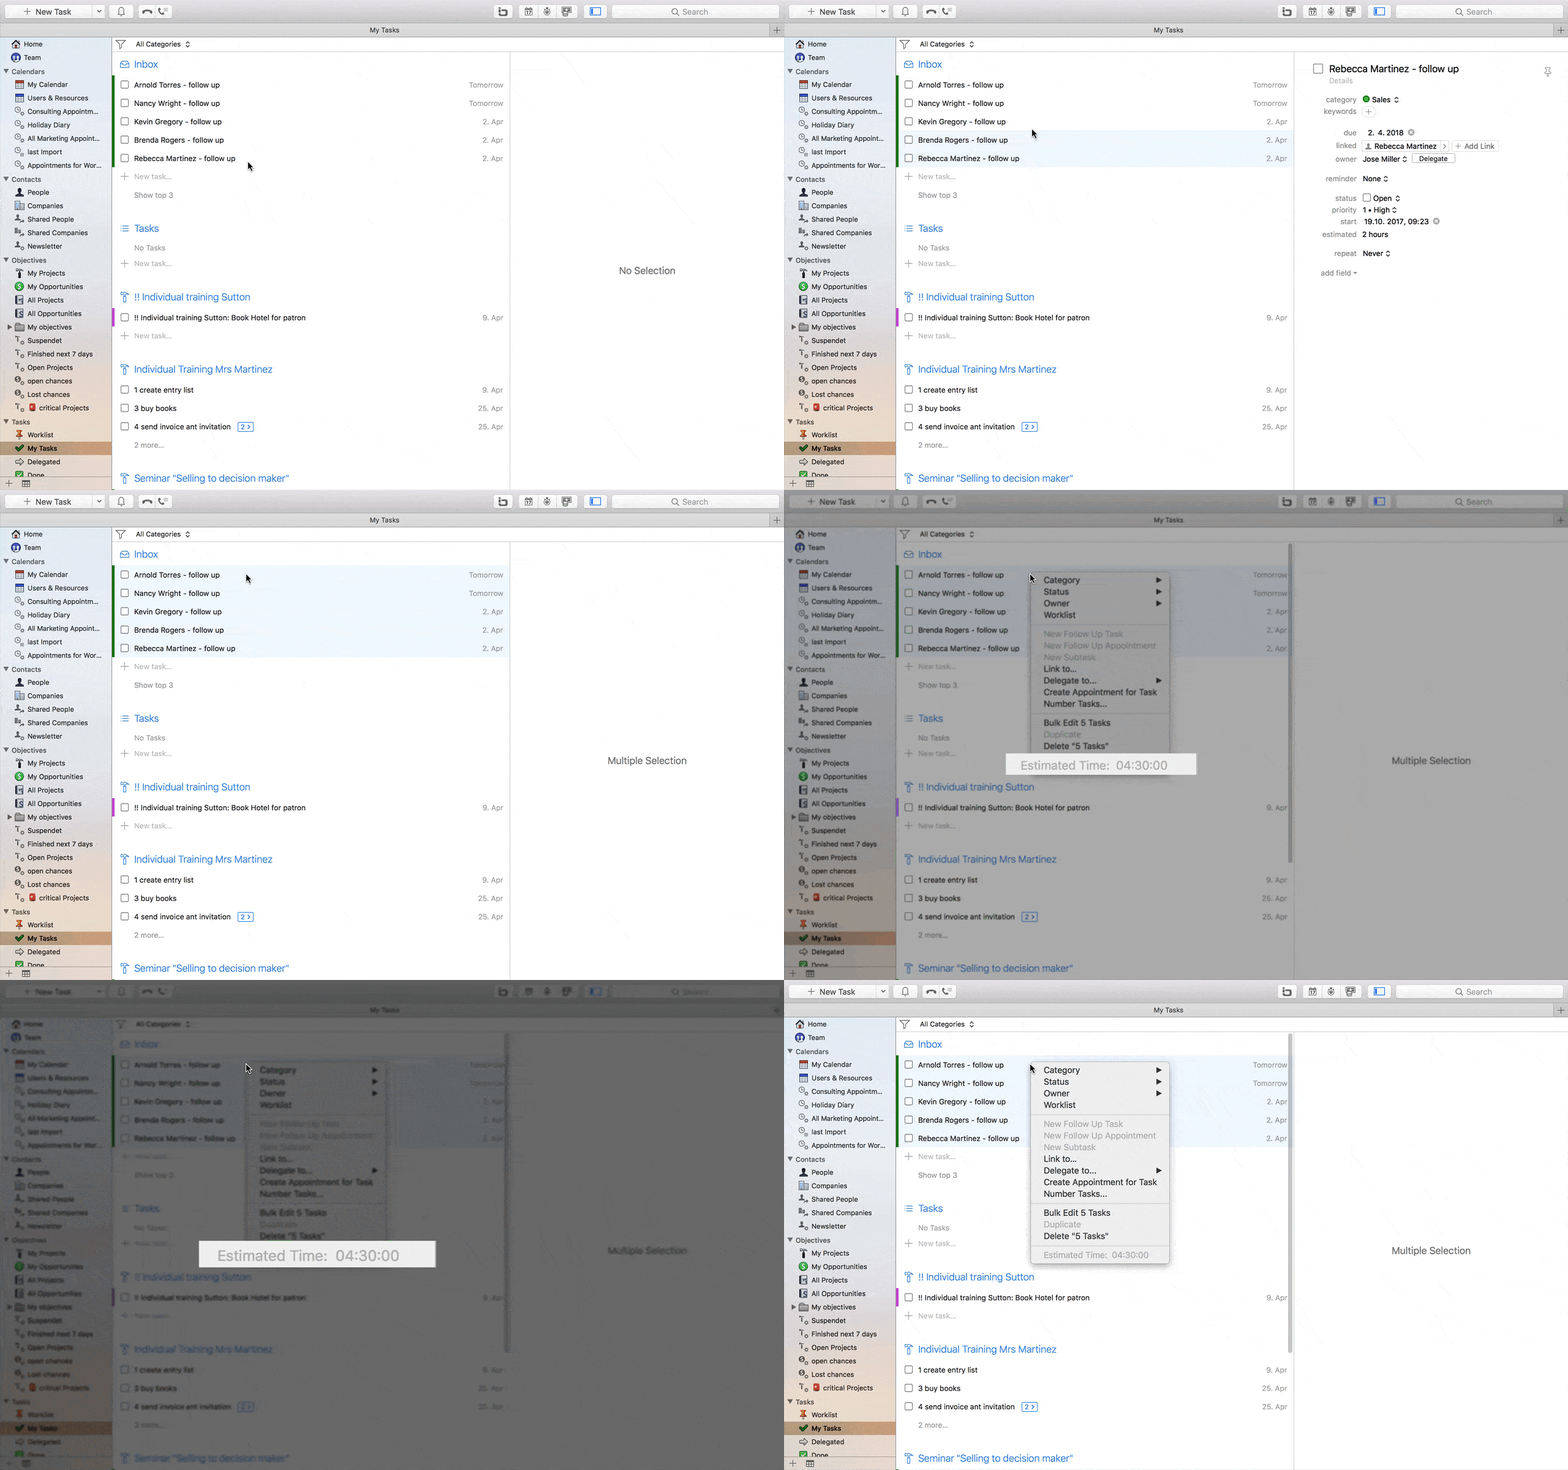
- Use the right mouse button. The sum of all estimated times for the tasks is displayed in gray
Numbering tasks
If you need to manage a large number of tasks within a project in Daylite, it is helpful to number them in order to either create a chronological list or uniquely define tasks.
Select the task in Daylite and right-click on Number Tasks. Thus, the tasks will be numbered.
Creating multi-tasks
The Create Multi-Task function helps you to create individual tasks for a selection of people.
- Select the records you would like to create a task for
- Select Plugins from the menu bar, navigate to ProductivityTools -> Create Multi-Task and enter the desired task details
- Click Add to create the task
In the task title you can use the placeholder @@, which is replaced by the individual name of the selected records. This makes it easier to distinguish between the tasks created.
Converting a note into a task
To convert a note into a task, proceed as follows:
Select the note in Daylite and right-click it to select Convert to Task.
Appointments
Creating an appointment from a task
If you would like to enter a task into your calendar as a concrete appointment, you can do so with the help of the ProductivityTools plugin.
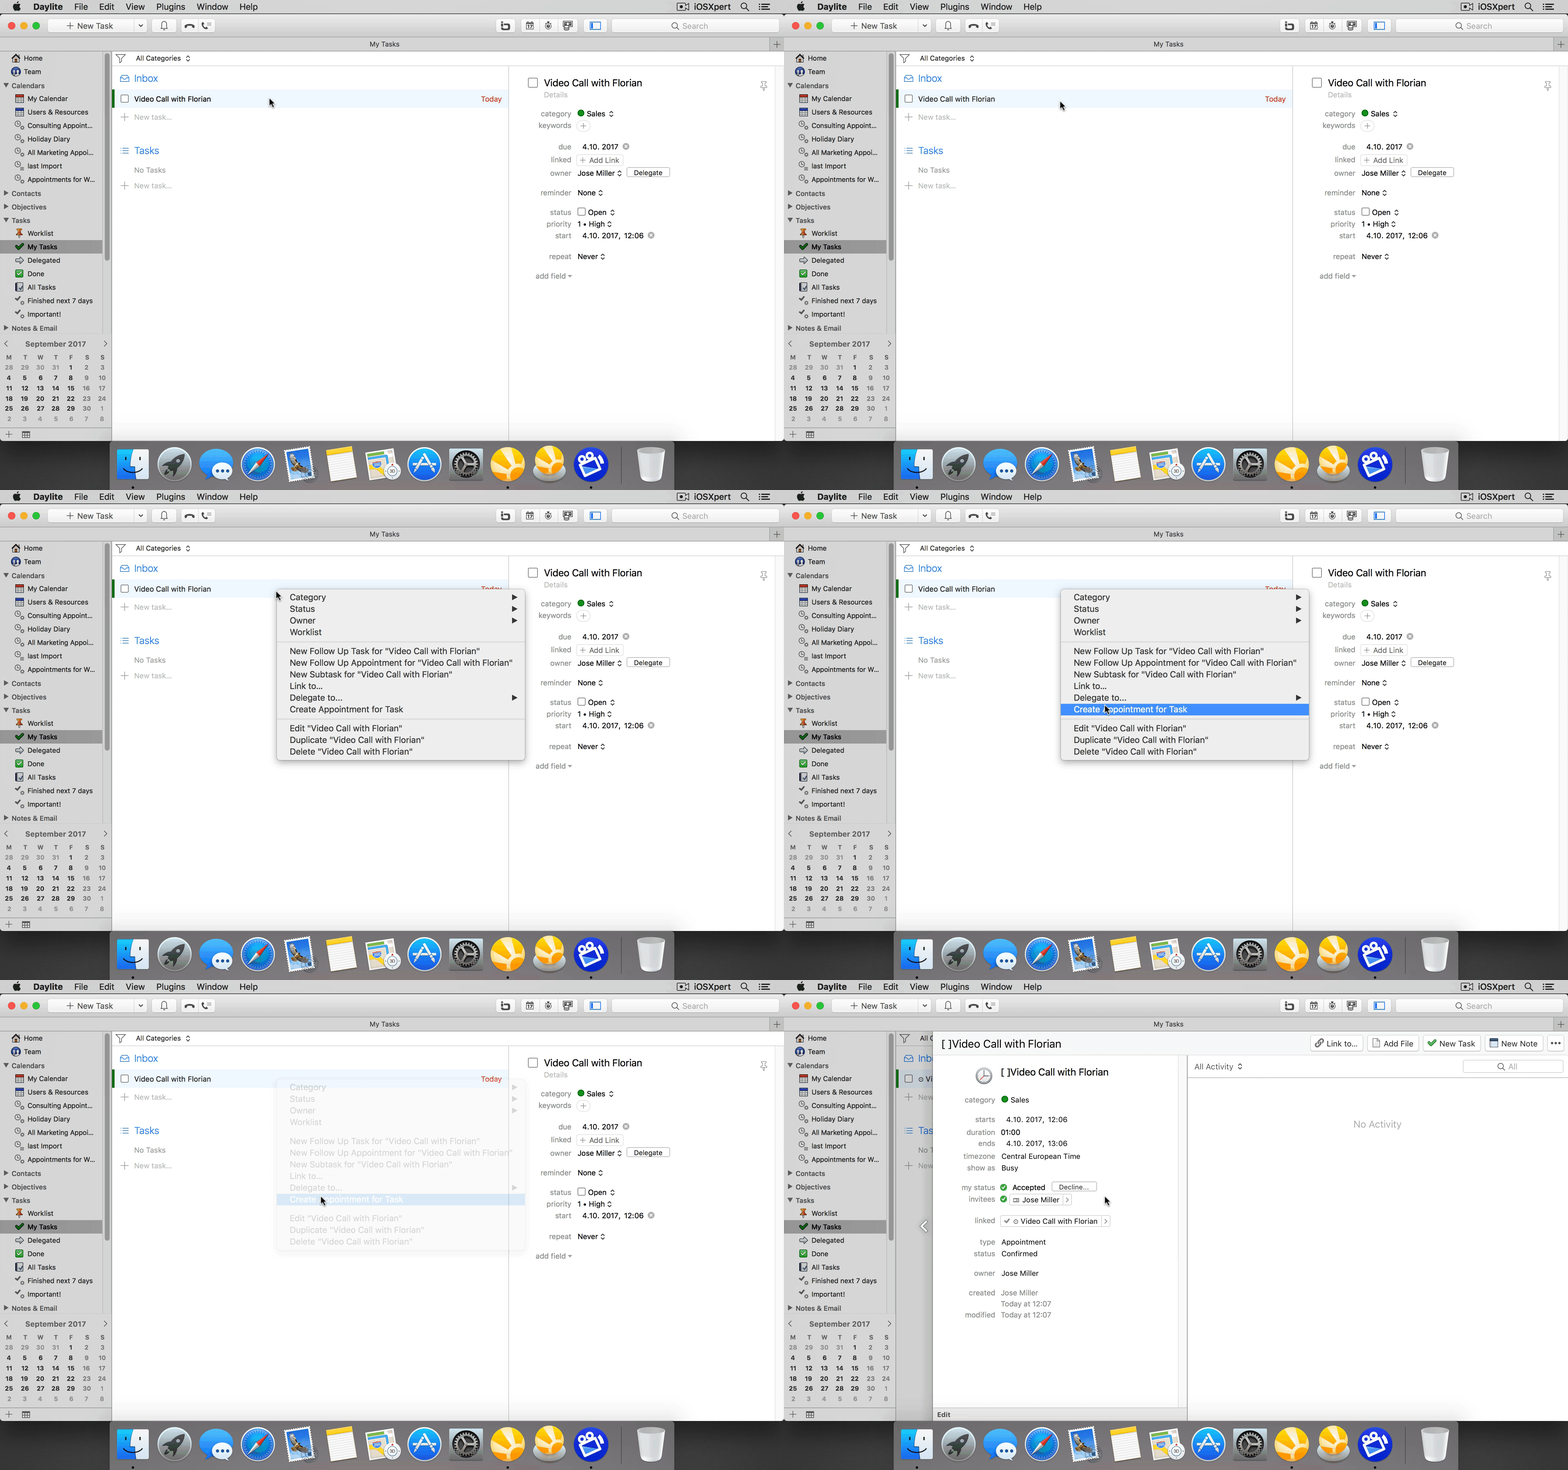
- Select the task in Daylite for which you want to create an appointment
- Perform a right click
- Select Create appointment for task
Duplicating appointments
With this function it is possible to duplicate an appointment quickly. All objects linked to the appointment are copied.
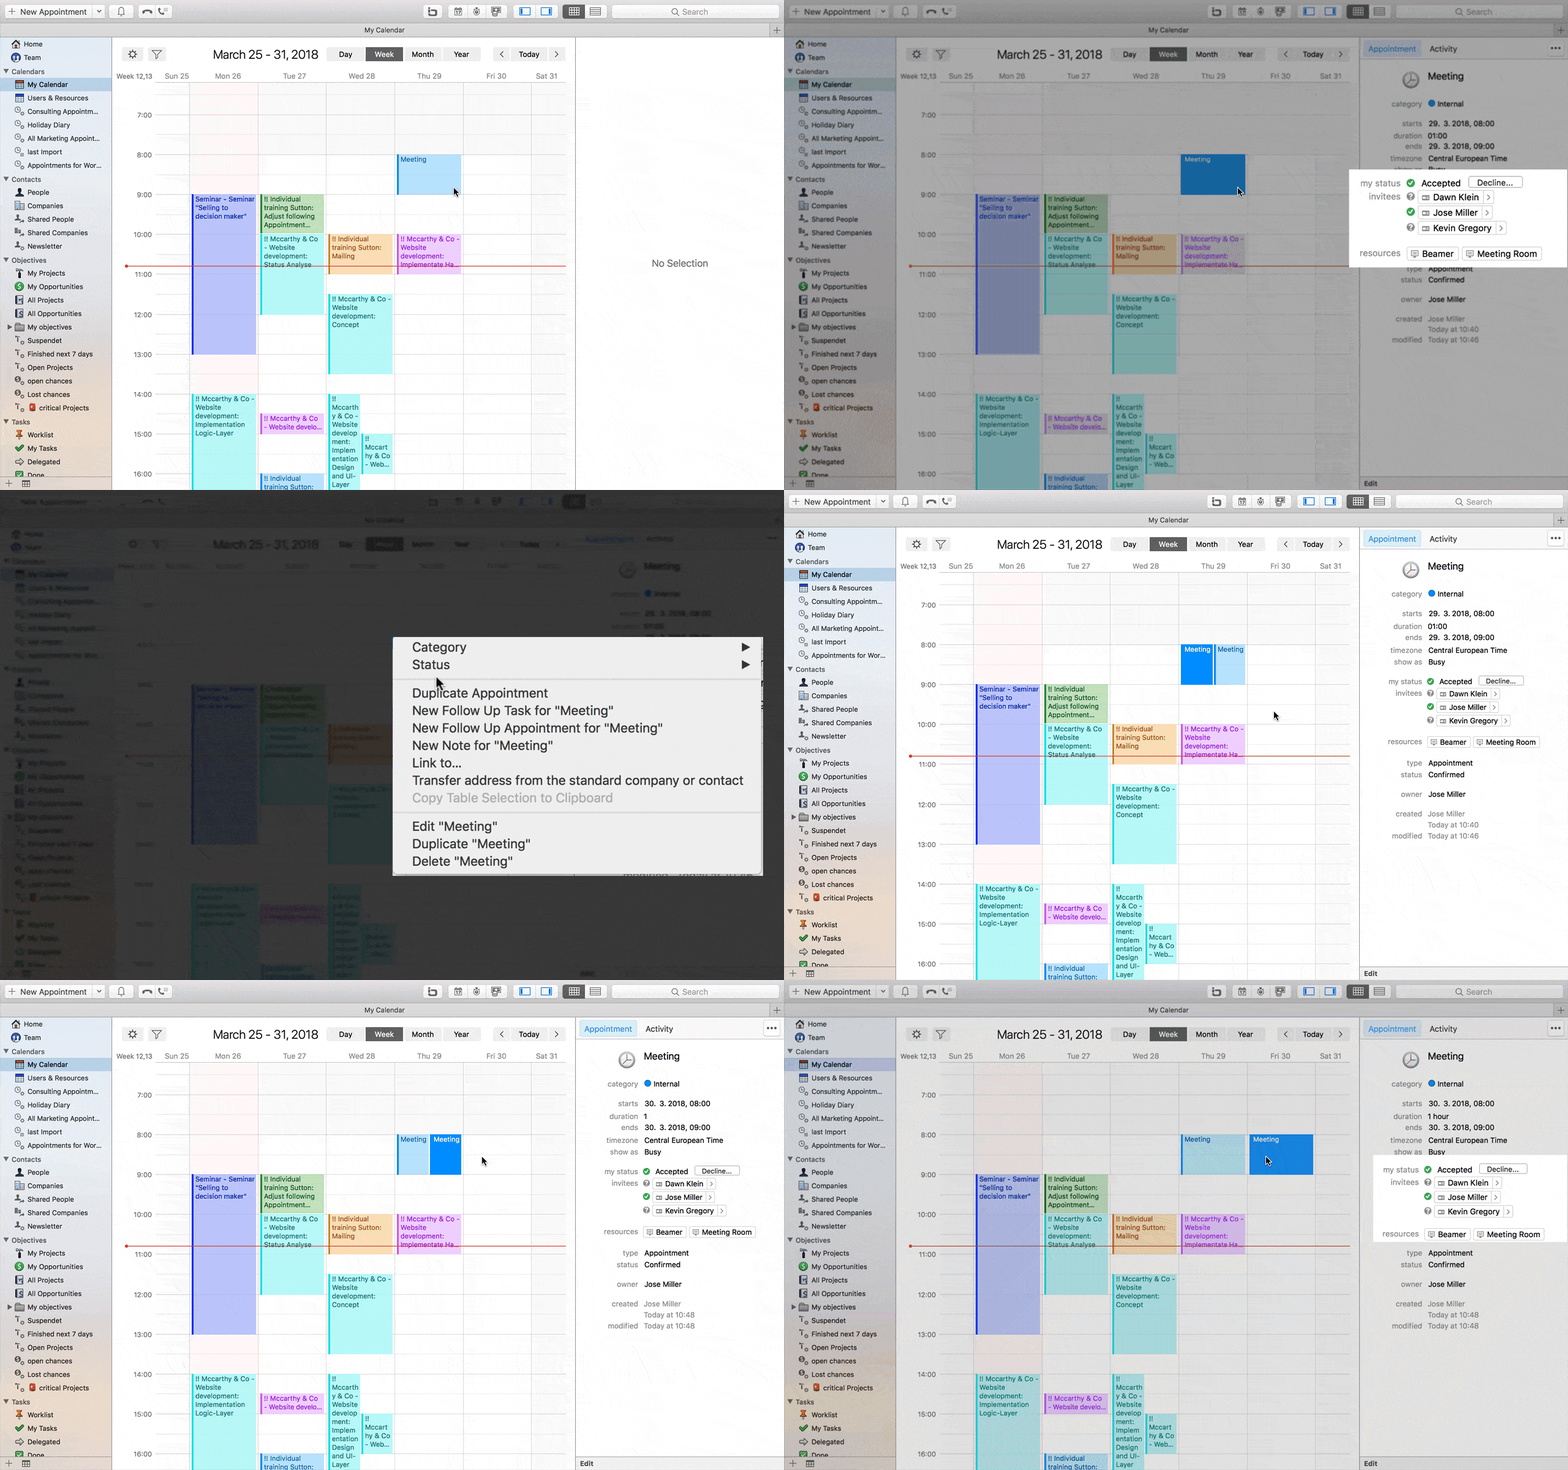
- Select the appointment to be duplicated
- Use the right mouse button to choose Duplicate Appointment
Confirming appointments for other users (Calendar Assistant)
When you create an appointment in Daylite where another Daylite user is invited or the appointment is delegated to a Daylite user, this user receives a Daylite notification and needs to confirm the appointment.
The Calendar Assistant allows you to confirm an appointment for other Daylite users. You can also specify whether or not Daylite users should receive a Daylite notification for the appointment. This is helpful wherever appointments are created for other Daylite users on a regular basis and additional confirmation of the appointments is not required.
Please proceed as follows:
- Create the appointment as usual in Daylite and invite one or more Daylite users, or delegate the appointment to a Daylite user
- Check Accept all invitations to automatically accept the appointment for the other Daylite users
- Check No notifications to suppress the Daylite notification for the appointment, if desired
- Save the appointment
Batch Actions for Records
Delegating multiple objects at once
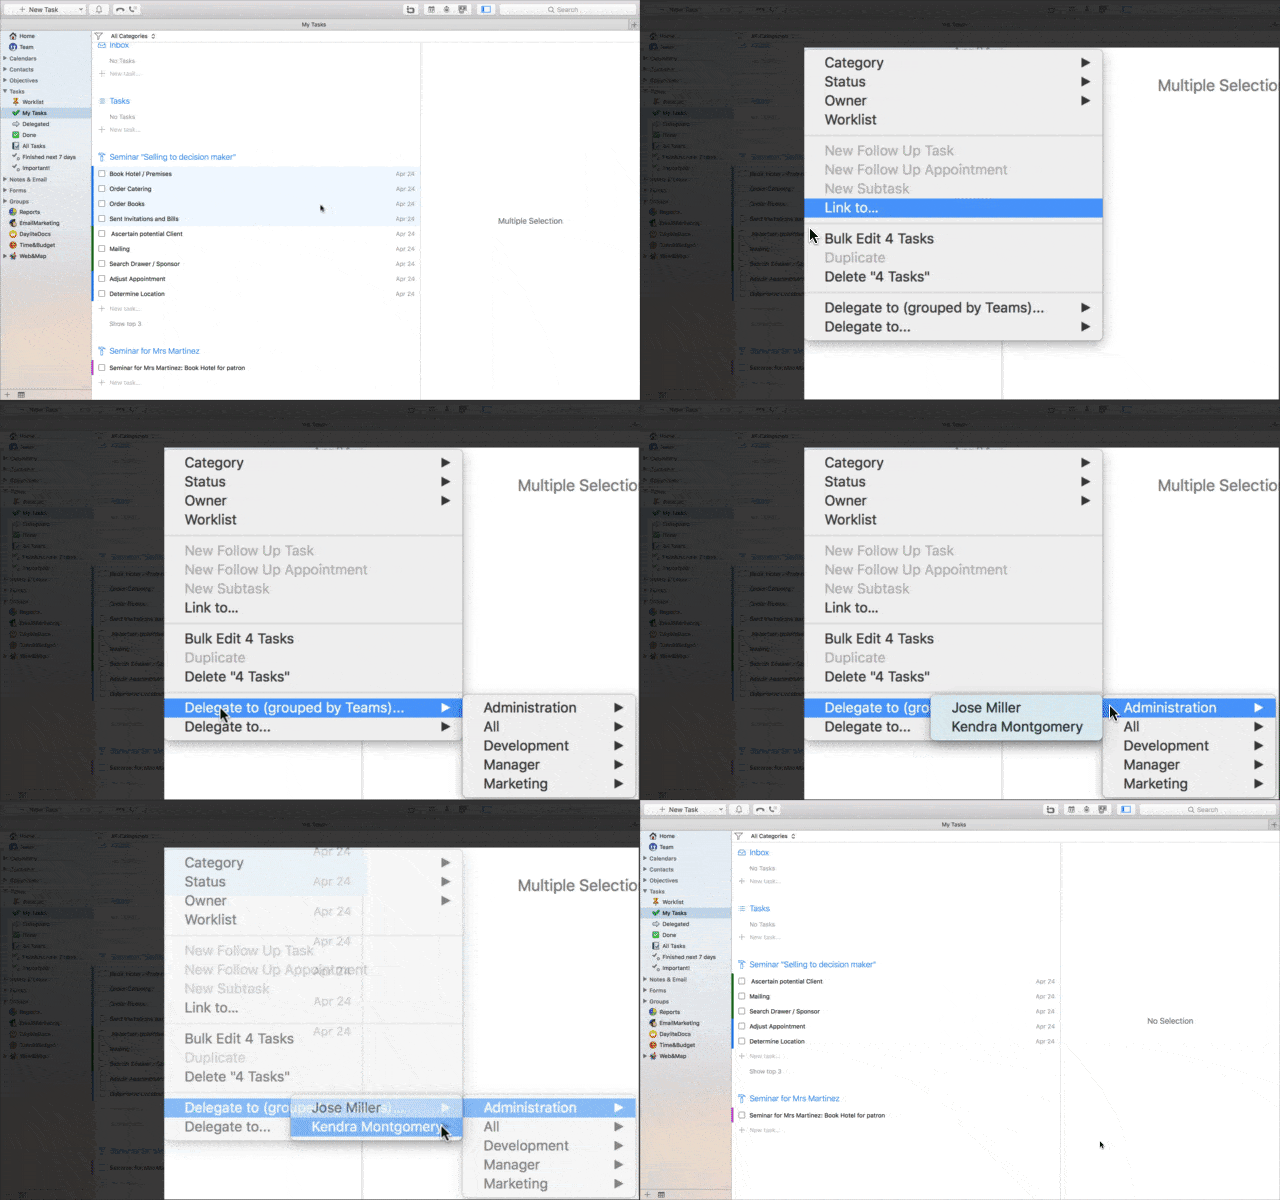
The Delegate to... function enables you to delegate a selection of Daylite objects at once to another Daylite user.
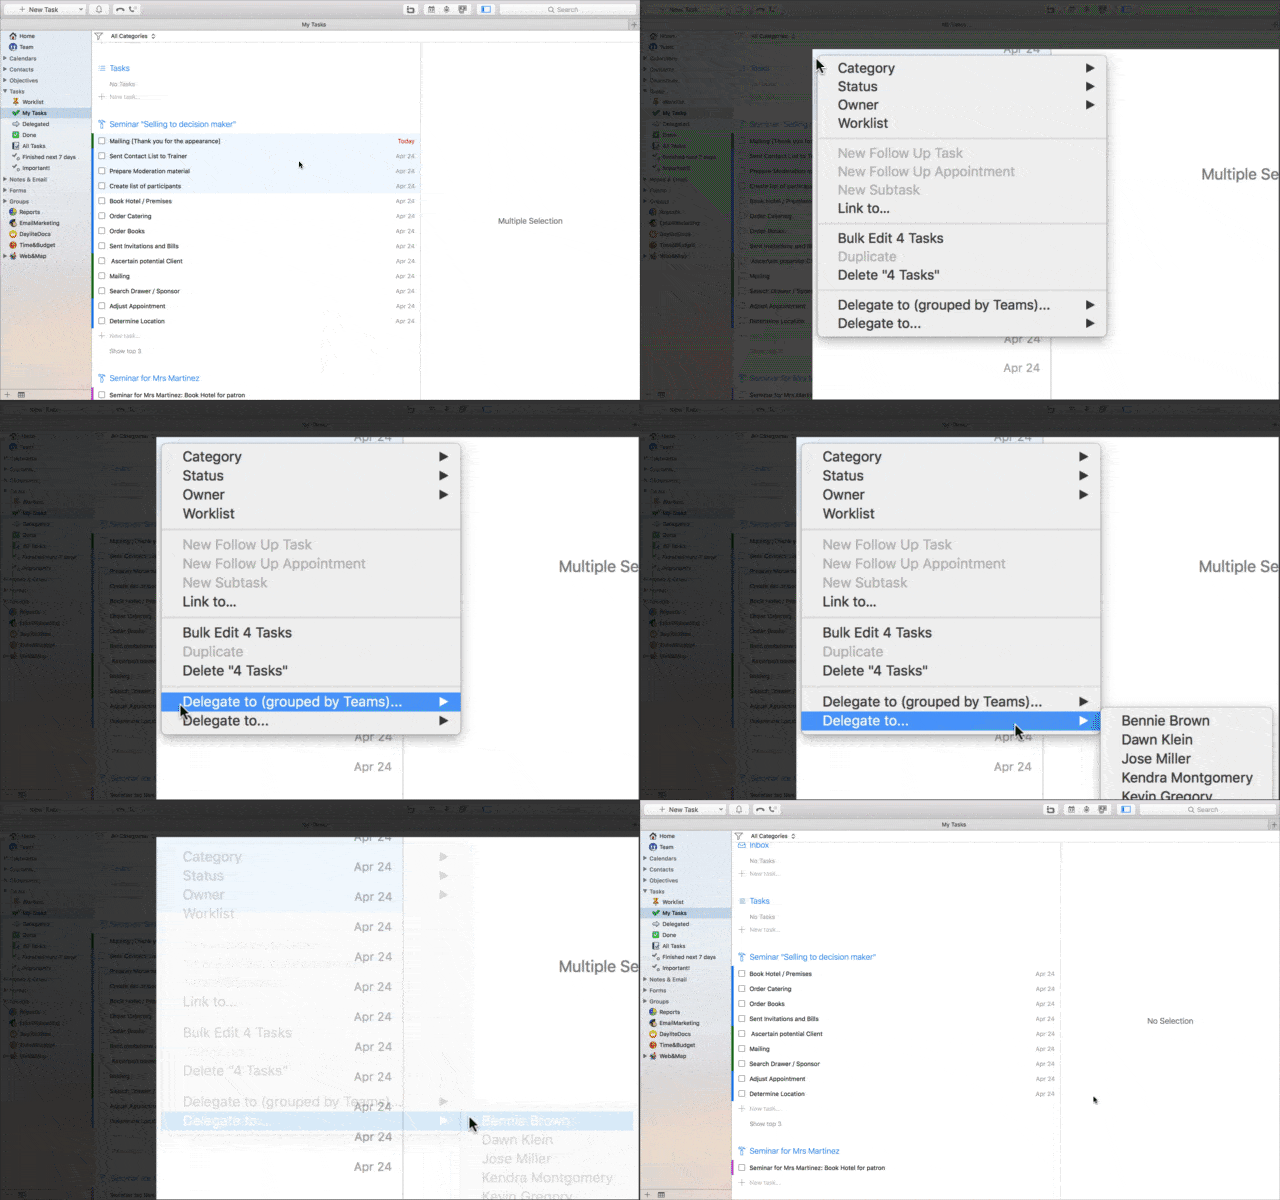
- Select the objects you would like to delegate
- Right-click the objects and select Delegate to from the contextual menu
In larger teams, simply use Delegate to (grouped by teams)...
Batch-creating multiple forms
The process of filling in the same form for different people in Daylite, or a series of forms for one person, is often very time-consuming and prone to errors. With the help of the Form batch entry function, you can greatly simplify and accelerate the process of filling in forms.
If you want to create a form for more than one person, proceed as follows:
- Select the desired contacts
- Right-click the selected contacts and choose Multi form batch entry from the contextual menu
- Now select the desired form
- Check the options that will stay the same with every selected person
- Click Create and next to create the form
If you want to enter more than one form for a person, proceed as follows:
- Select the desired contact
- Right-click the selected contact and choose Form batch entry from the contextual menu
- Now select the first desired form
- Check the options you want to use in the other forms as well
- Click Create and next to create the form, then select the next desired form
If you want to create the same form for all selected contacts with one click, proceed as follows:
- Select the desired contacts
- Right-click the selected contacts and choose Multi form batch entry from the contextual menu
- Now select the desired form
- Check all the form entries that you want to apply to all persons
- Click the Create for all button
Additional Features
Copying a table to the clipboard
The Copy Table Selection to Clipboard function allows you to copy information from the table/list view in Daylite to the clipboard as a formatted table. From there you can then paste these tables into other programs, such as an email.
- In table/list view, select the rows you want to copy to your clipboard
- Right-click the selection and choose Copy Table Selection to Clipboard from the contextual menu
- You can now paste the table into any program
Sending tasks and appointments by email
For sending tasks or appointments by mail, the Daylite extension ProductivityTools needs to be installed.
These are the steps to send a task or an appointment by mail:
- In the Daylite Plugins menu, navigate to ProductivityTools -> Preferences
- Choose the tab Email Templates
- Create a new template with the details you want to send by mail
- Close the Preferences
- Select the appointment or task you want to send
- In the Daylite Plugins, navigate to ProductivityTools and select Send as Email
Running your own scripts with the Daylite Automator
The Daylite Automator included in the Daylite ProductivityTools allows you to execute predefined scripts for a selection of datasets in Daylite at the touch of a button. The possibilities range from simple actions to make work easier, such as transferring an address into an appointment, to automating complex workflows.
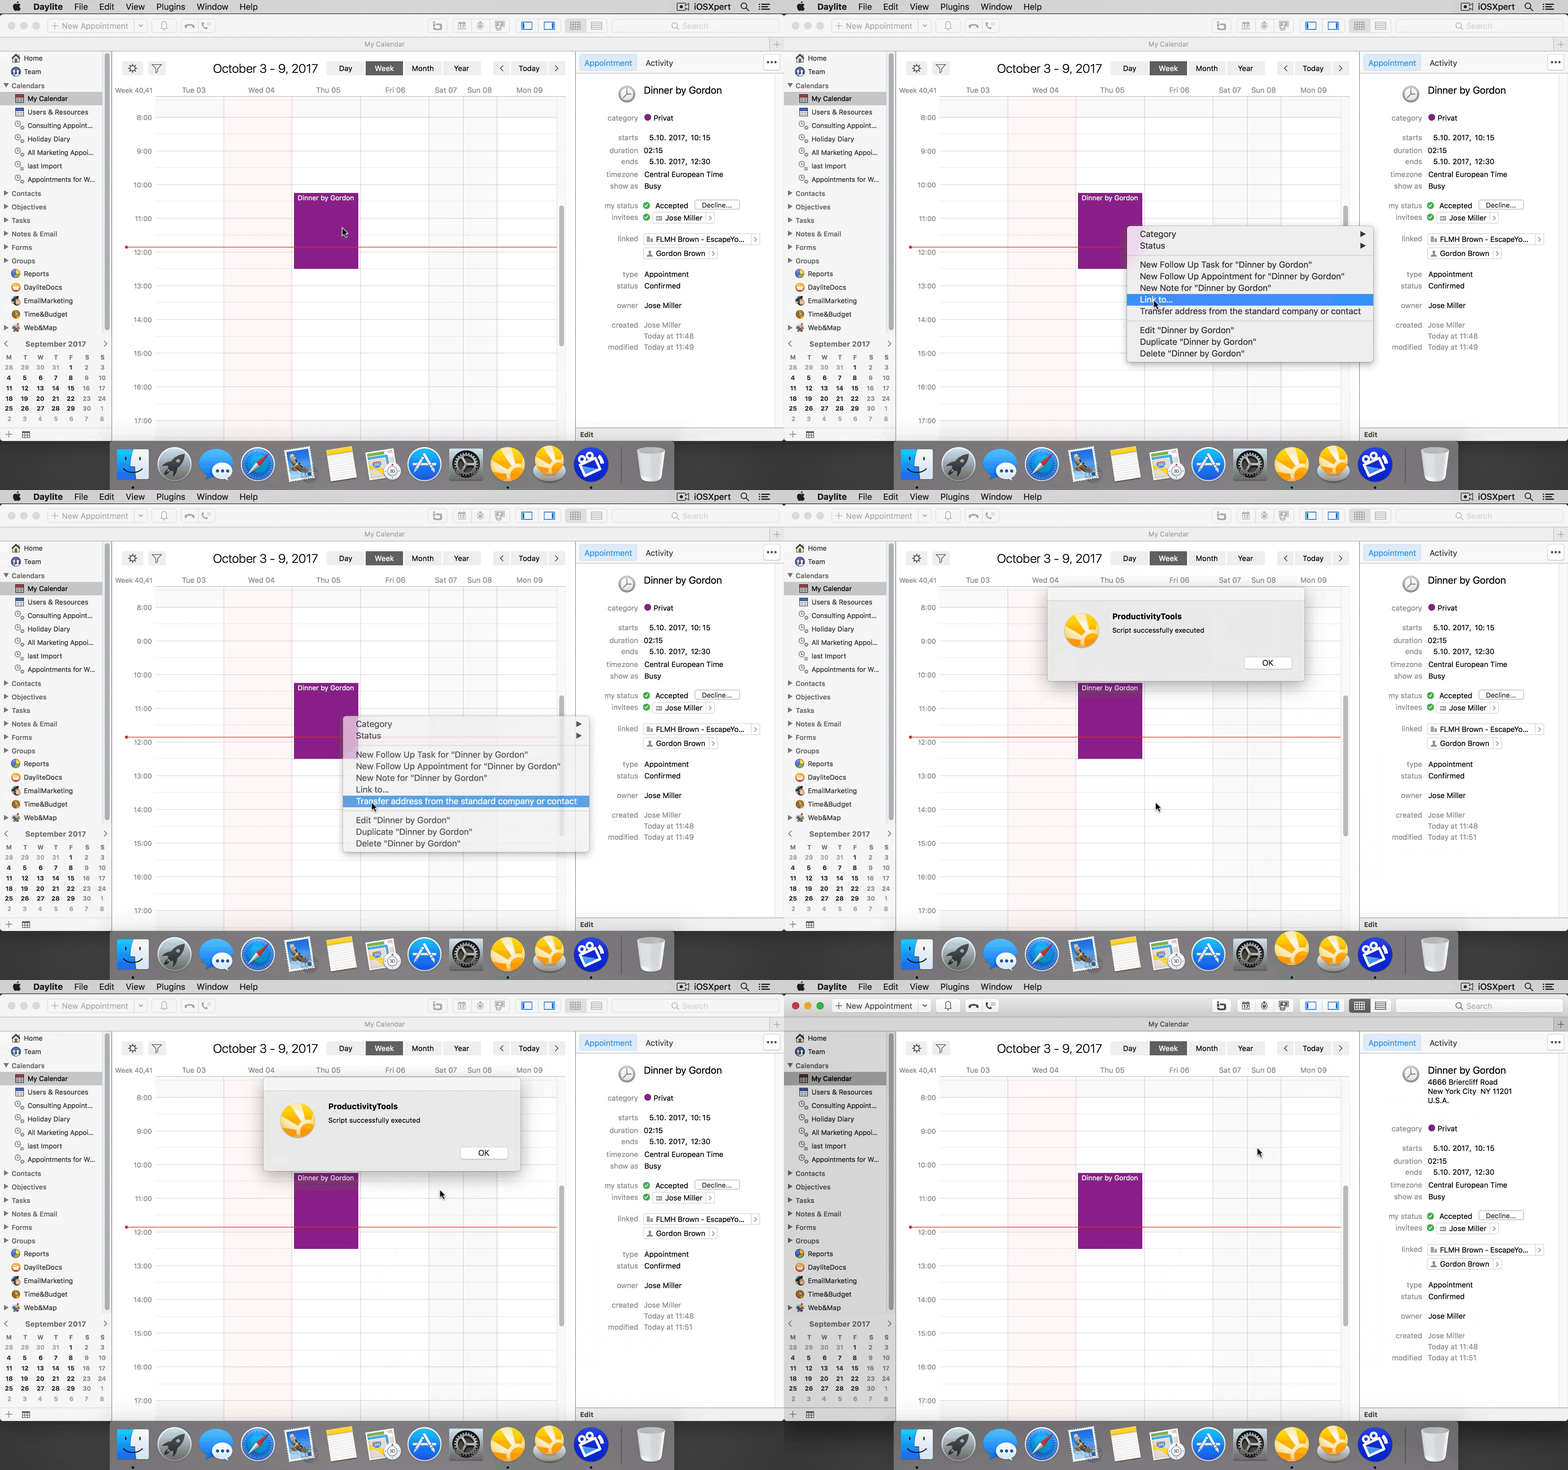
If you have programming skills, you can create these scripts yourself. If not, we will be happy to help you out on this – just get in touch with us.