Kanban (Japanese kan = signal, ban = card) is an agile project management method developed by Toyota Motor Corporation. The Kanban method helps you to better control and visualize a project and its associated tasks, increasing your company's productivity.
The Daylite Plugin Boards allows you via drag and drop to easily organise and visualise your tasks from projects and opportunities in Daylite as Kanban-Boards. You and your team keep track of relevant tasks and can respond to shortages in time.
Use boards as a controlling tool to better structure tasks for projects and opportunities and thus work efficiently with your team.
Table of Contents
Setting up and managing boards
- How do I create a board?
- What happens if I delete a board?
- How do I manage columns in Boards?
- How do I save and manage templates for Boards?
The Backlog column
Tickets: create, delegate and edit
- How do I create a ticket in Boards?
- How can I delegate a ticket in Boards?
- How do I delete a ticket in a board?
- Can I use subtasks in Boards?
- Can I use Activity Sets for Boards?
Views, groupings and filters
- What is the difference between Minimal View, Standard View and Expanded View?
- How do I work with grouping in Boards?
- How do I use the search function in boards?
- How can I filter in a board?
Board types and navigation
- What are Group Boards?
- Is there a full screen mode for Boards?
- How do I know that a board has been created?
- Where can I get an overview of all boards?
Setting up and managing boards
How do I create a board?
The Daylite app Boards allows you to create Kanban Boards for your projects and opportunities. Manage your relevant tasks, delegate these to your colleagues and avoid bottlenecks. The visual perspective allows you and your team to stay on top of things.
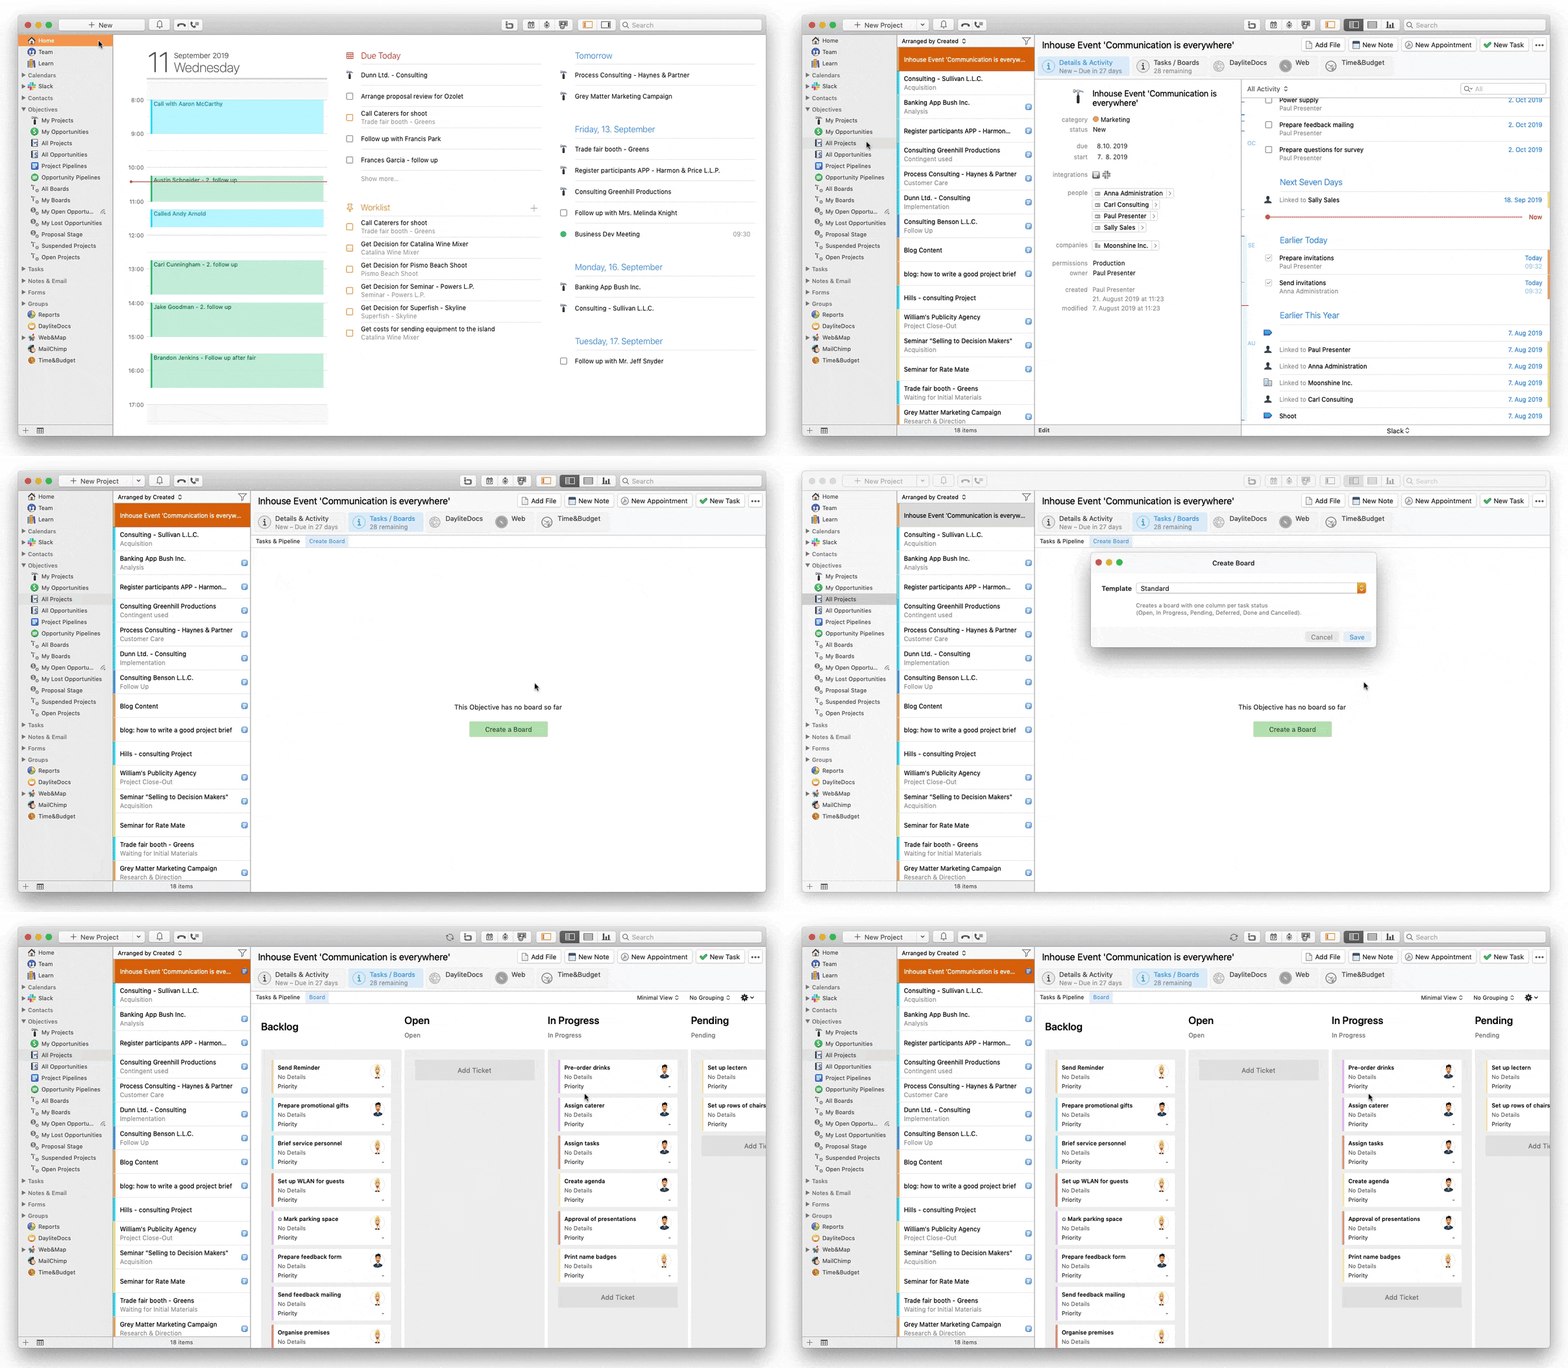
Follow these steps to create a board for a project or opportunity:
- In the Daylite sidebar on the left navigate to Objectives -> All Projects or All Opportunities
- Select the desired project or opportunity and click on the tab Tasks / Boards
- Below Tasks / Boards click on the tab Create Board
- Click the green button Create a Board to create a Kanban board
- Select a board template and click Save to confirm your selection
The Kanban board shows tasks linked with the project or opportunity by default in the column with the corresponding task status.
Learn how to create tickets (tasks) within the board, related to this project or opportunity:
How do I create a ticket in Boards?
What happens if I delete a board?
With the Daylite plugin Boards you're able to create individual Kanban-Boards for your projects and opportunities. This allows you to keep the overview and to avoid bottlenecks. The visualization within Boards makes this an easy task for you and your team.
It's easy to delete a board if you don't need it anymore or if you accidentally created one for a project or opportunity. This does not affect the tasks you created. You can still see them on the tab Tasks & Pipeline of your project or opportunity in Daylite.
Learn how to create a board in the following article:
How do I create a board?
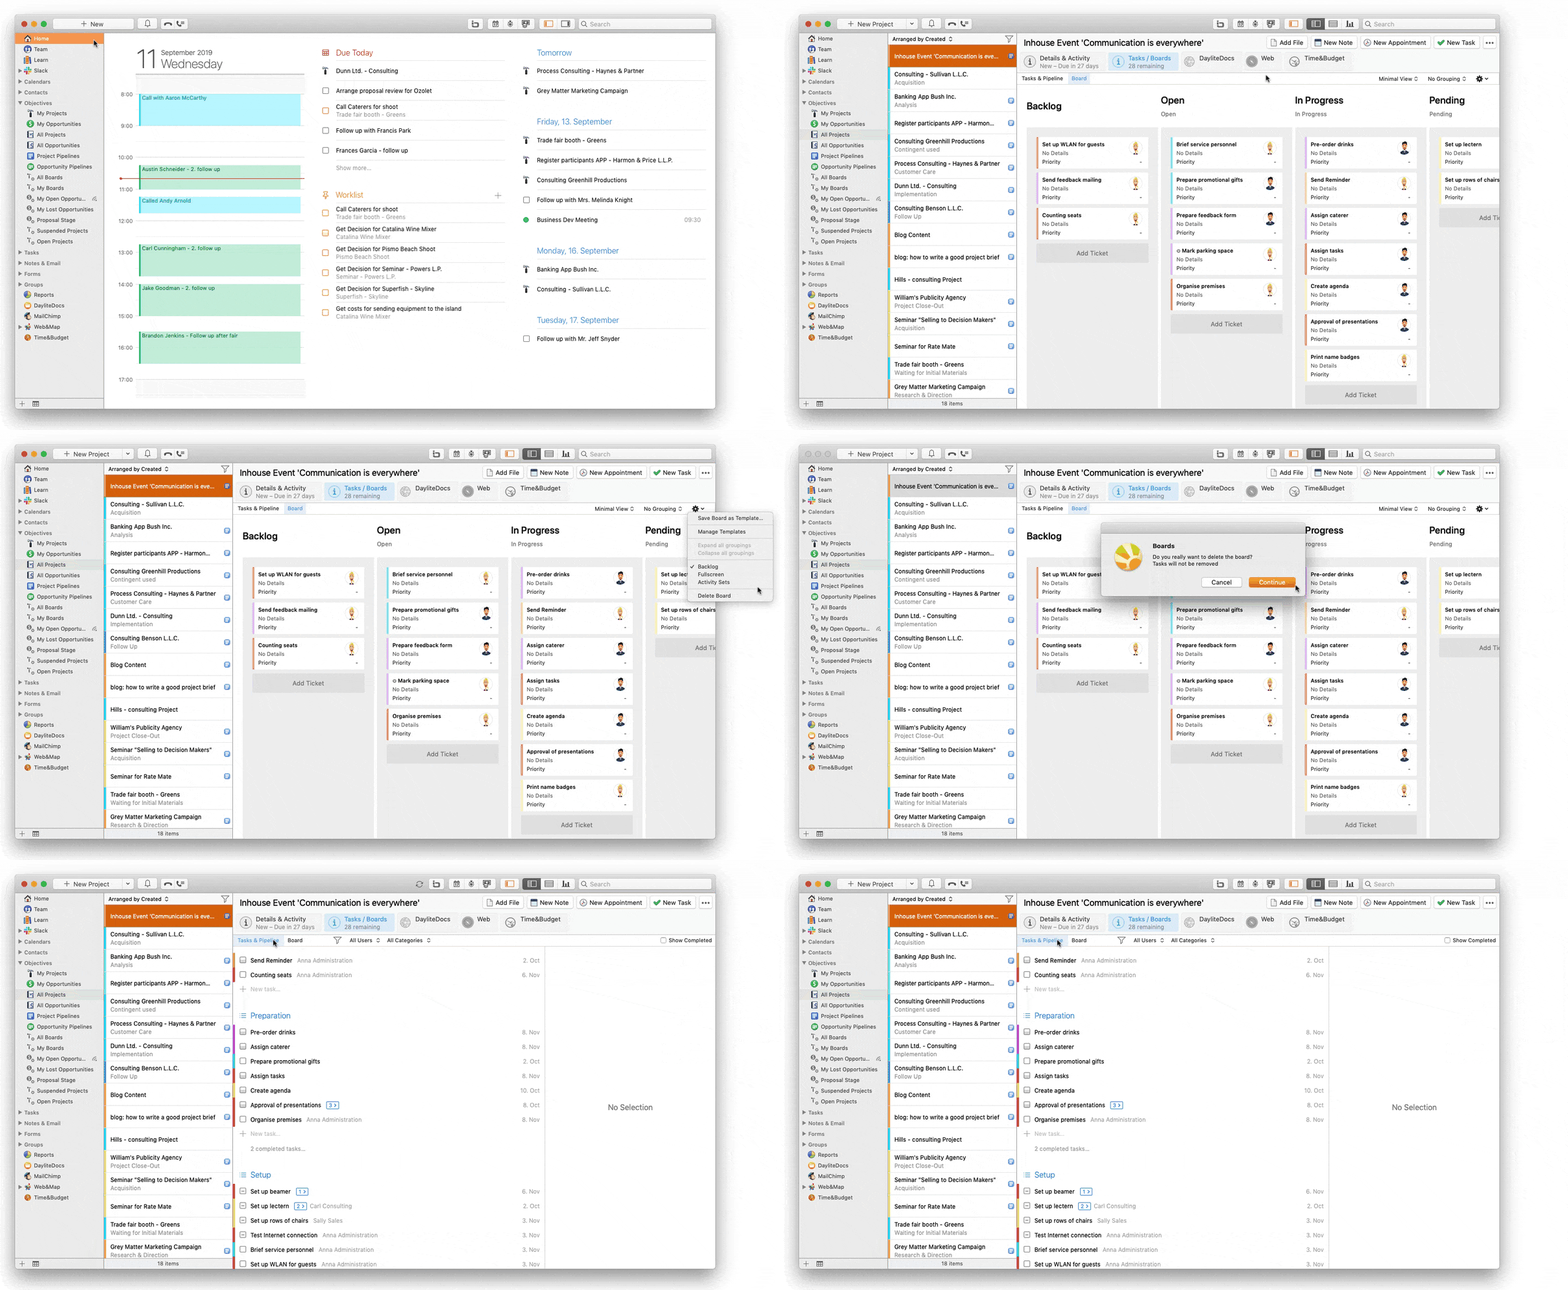
Deleting a board
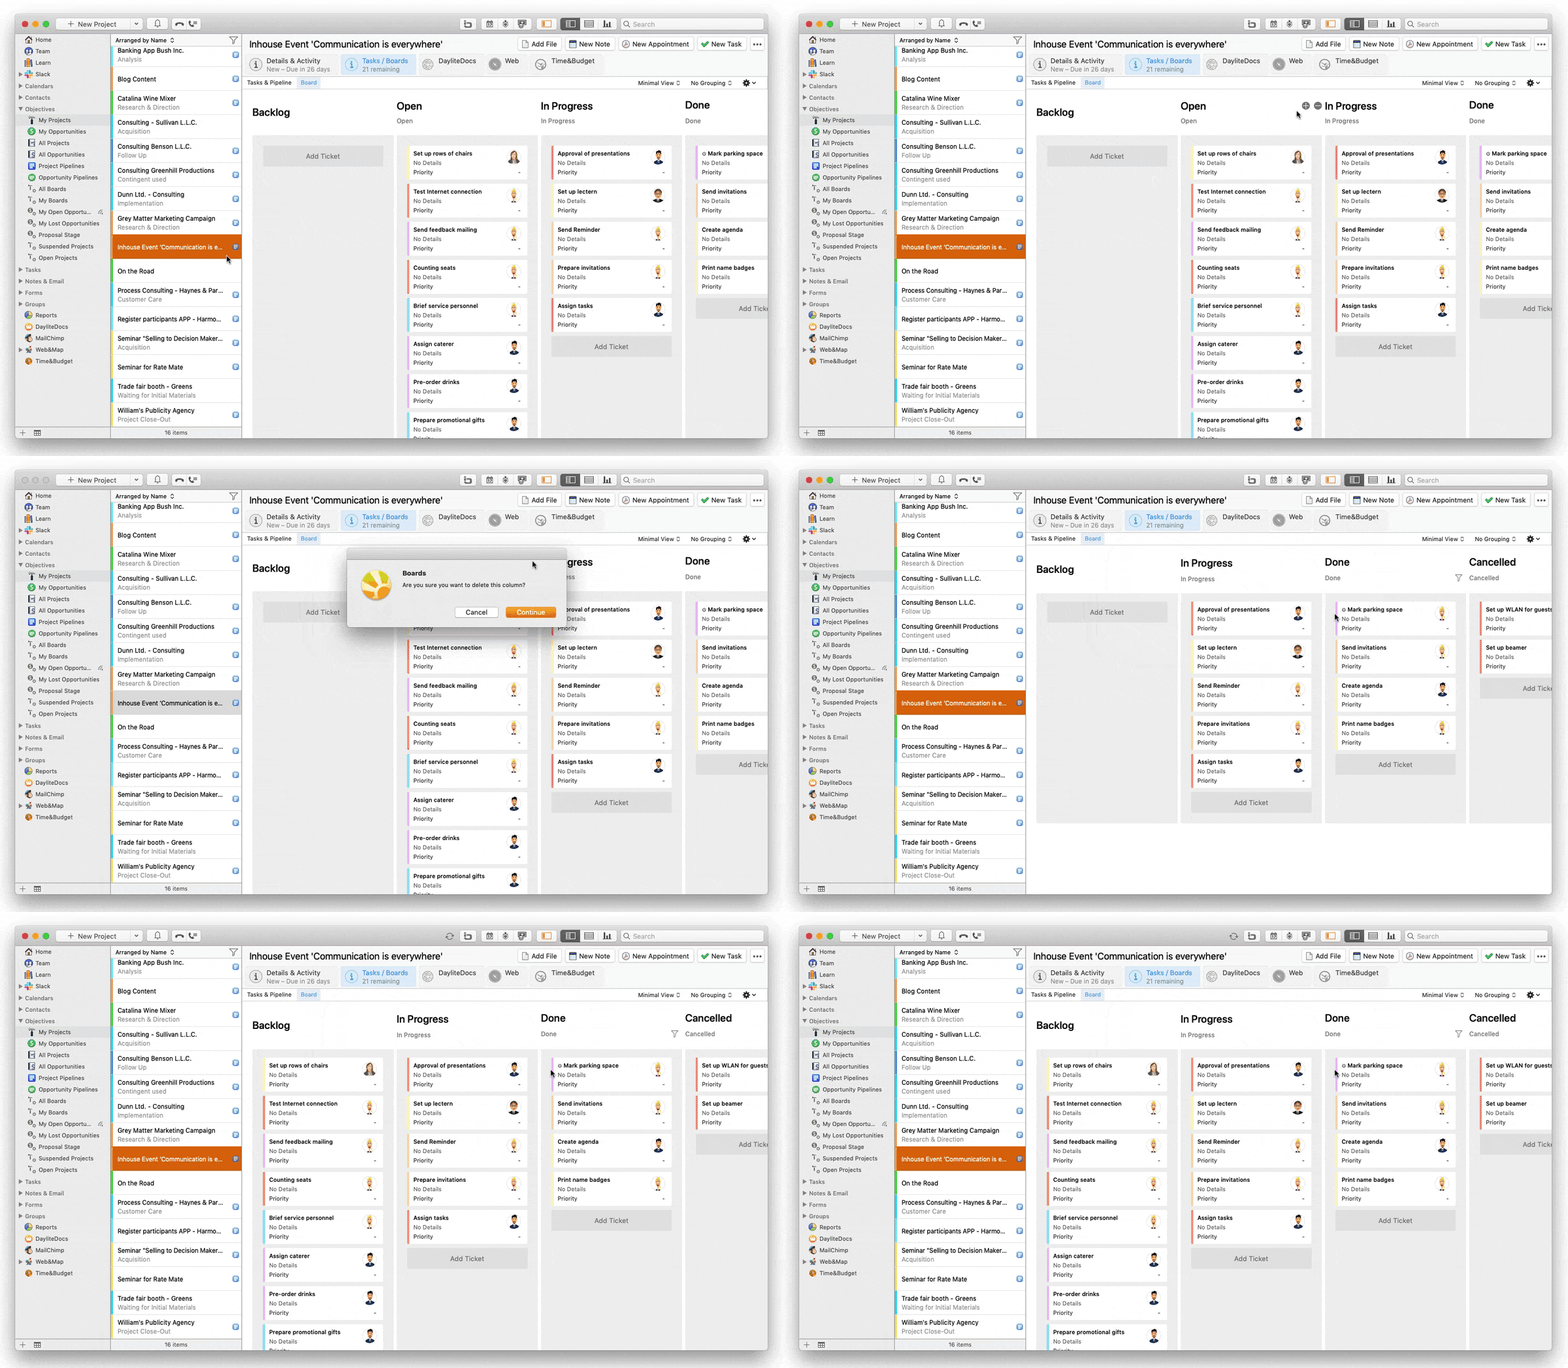
Follow these steps in order to delete a board:
- Using the left sidebar in Daylite, navigate via Objectives to All Projects or opportunities All Opportunities
- Select the project or opportunity whose board you want to delete. Via the tab Tasks & Pipeline navigate to Board. Alternatively, you can use the Daylite filter lists All Boards or My Boards to search for a board. These are displayed in the left Daylite sidebar under Objectives.
- While on the board, click on the gear icon to open the settings
- Select Delete Board from the drop-down menu and confirm this by clicking Continue. The tasks of the project or opportunity will be retained.
You can create a new board for the project or opportunity at any time.
Saving and managing templates for Boards is covered in this article:
How do I save and manage templates for Boards?
How do I manage columns in Boards?
Columns help you to visually structure tasks for a project or opportunity in Boards, a plugin for Daylite. They reflect the status of a particular task and help you and your team to stay on top of things and to avoid bottlenecks. You can manage columns in Boards individually. Add new columns, remove the ones you don't need or rename them.
Adding columns
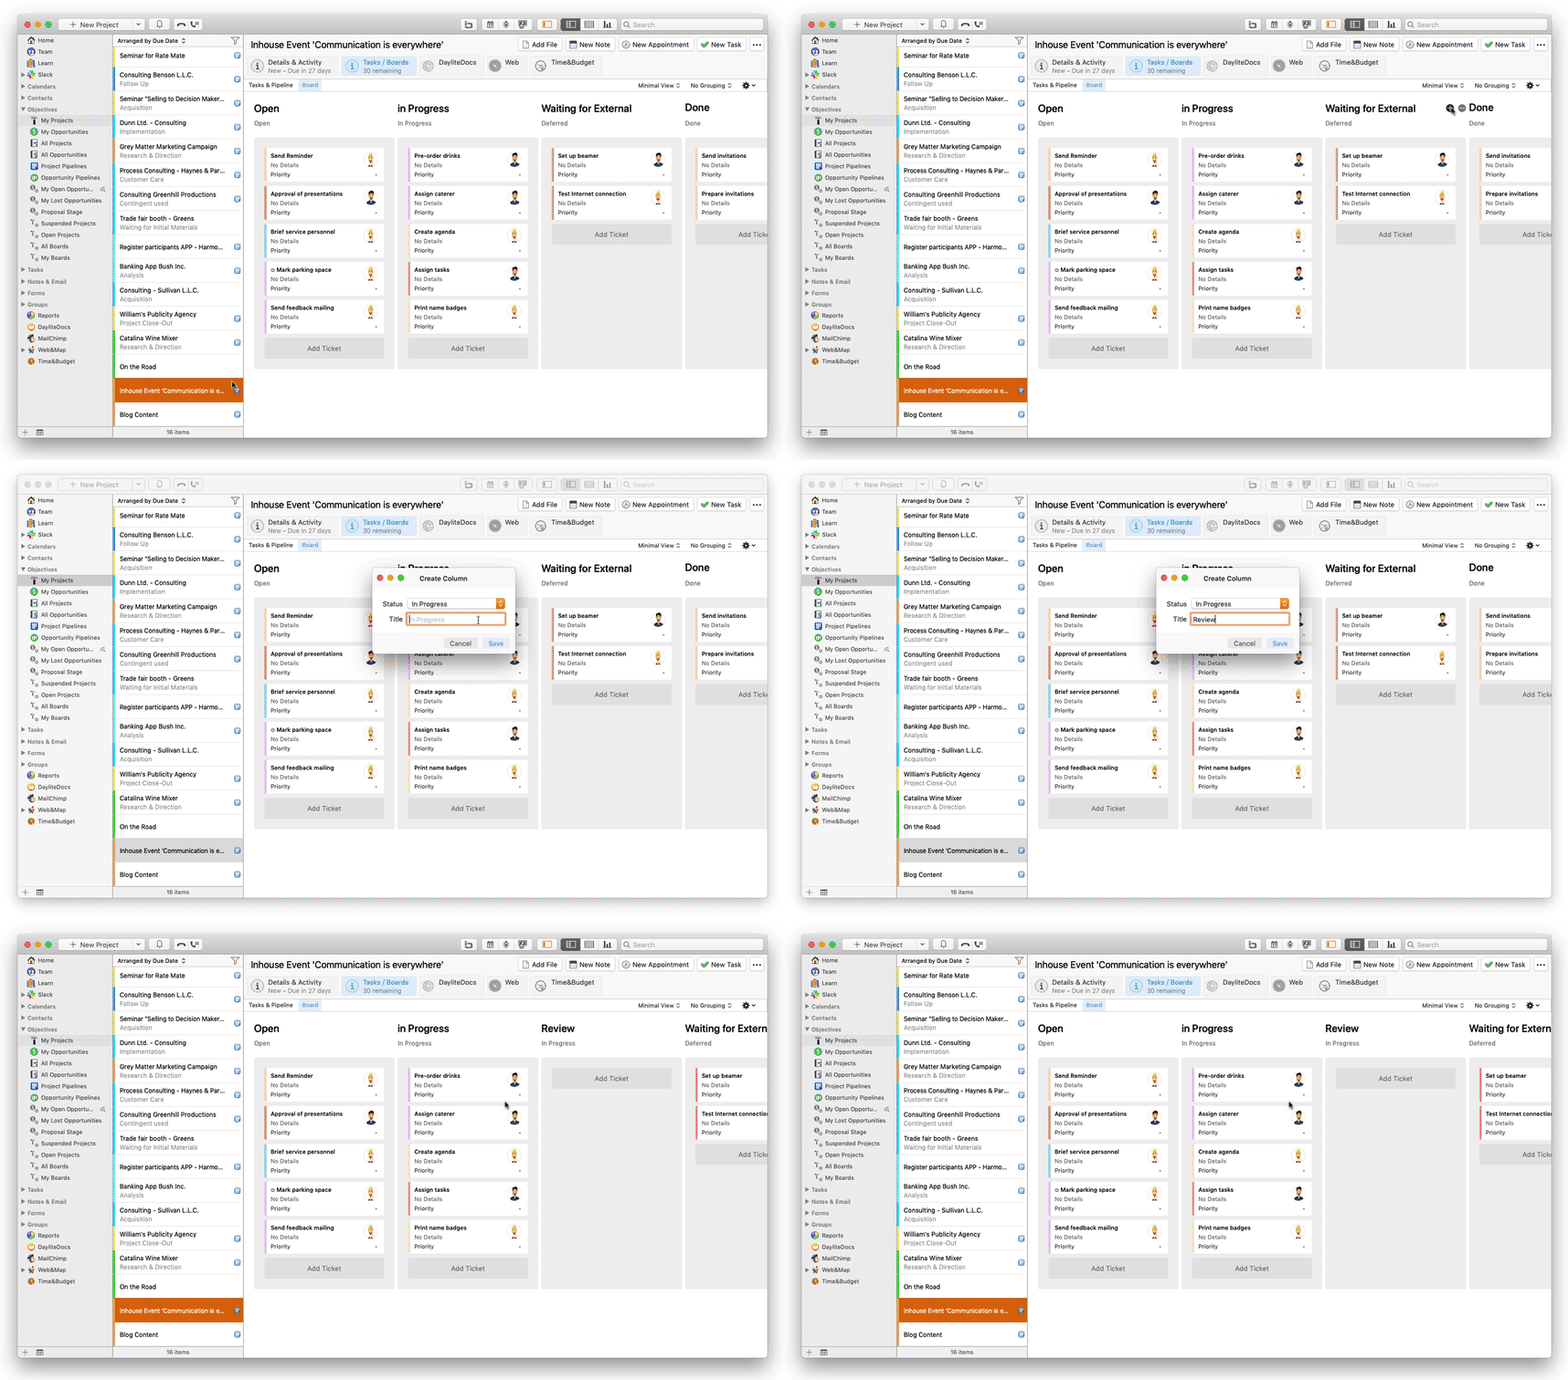
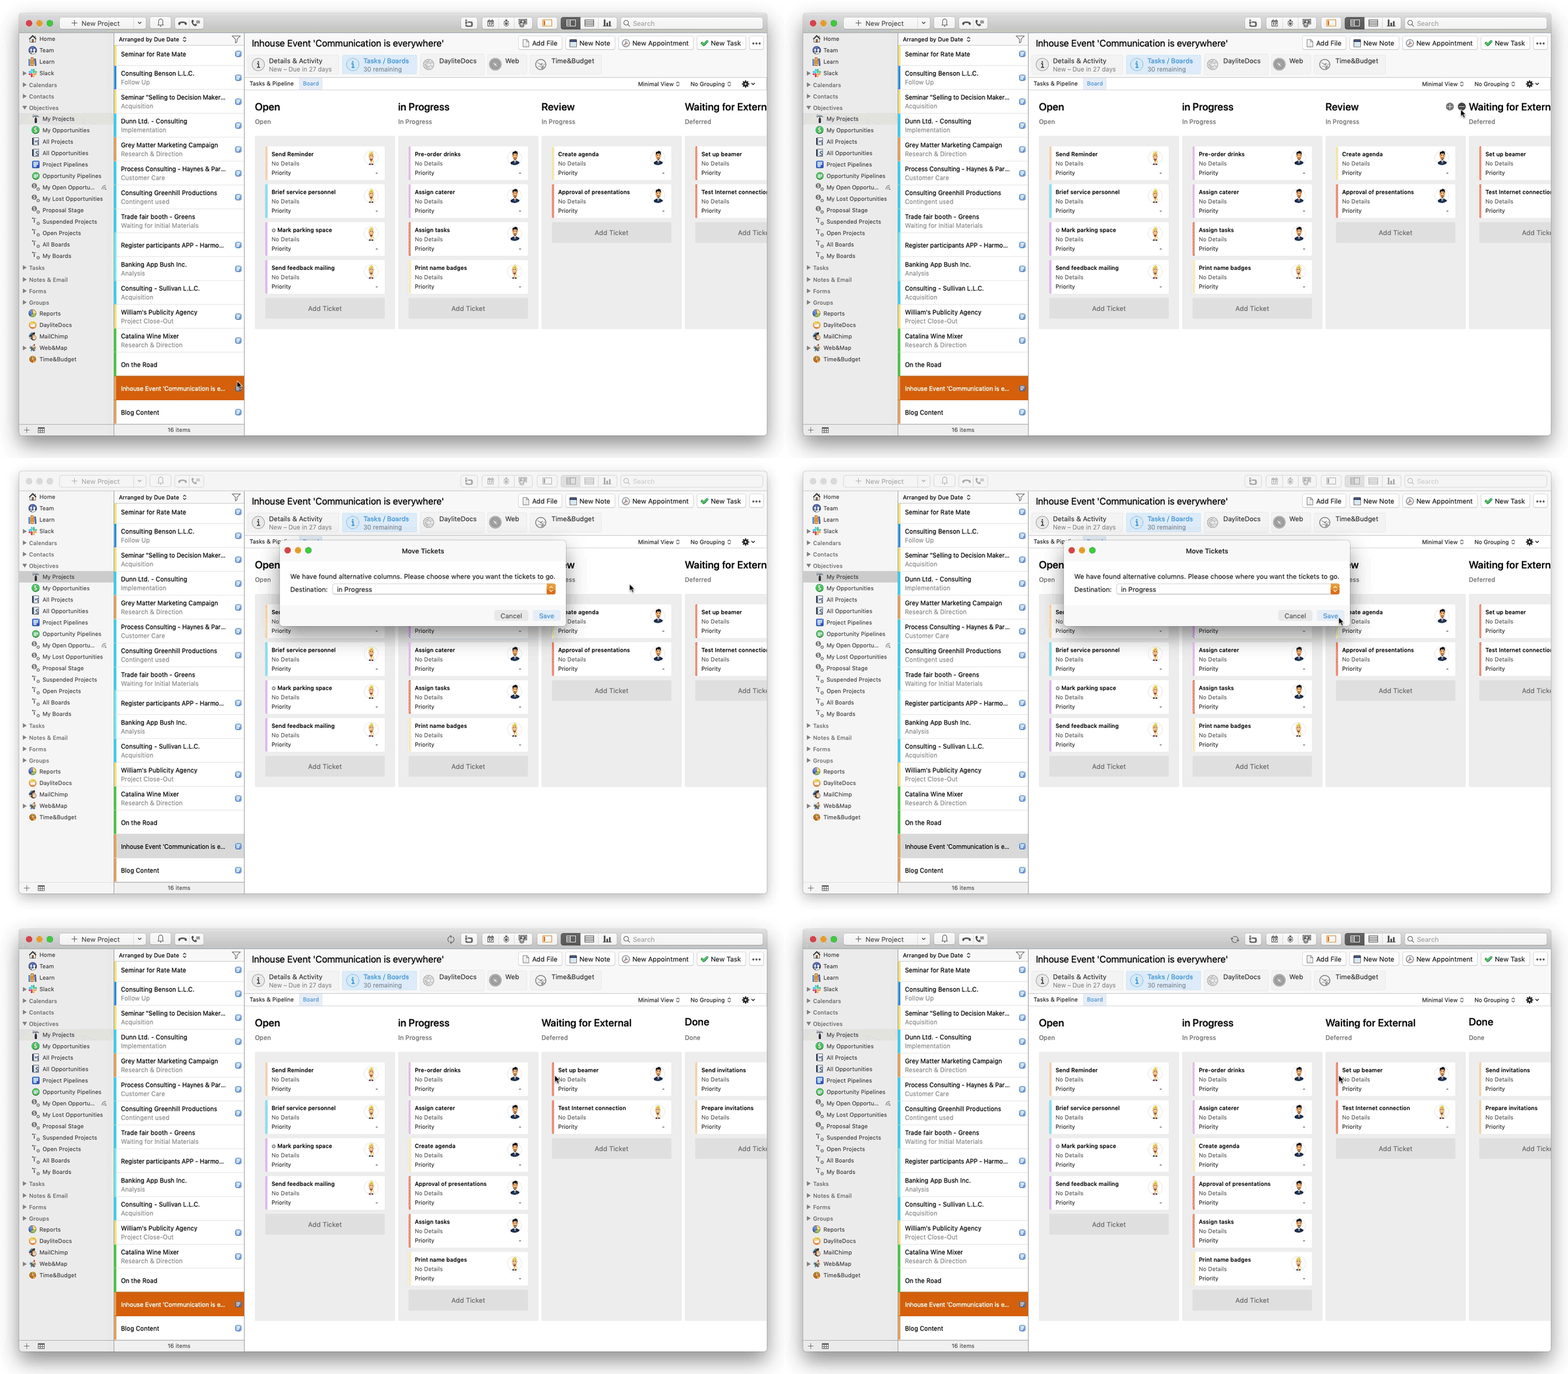
To add additional columns to your board, simply hover your cursor over the column header and click the plus sign.
Removing columns
To remove a column, hover your cursor over the column header and then click the minus sign.
Renaming columns
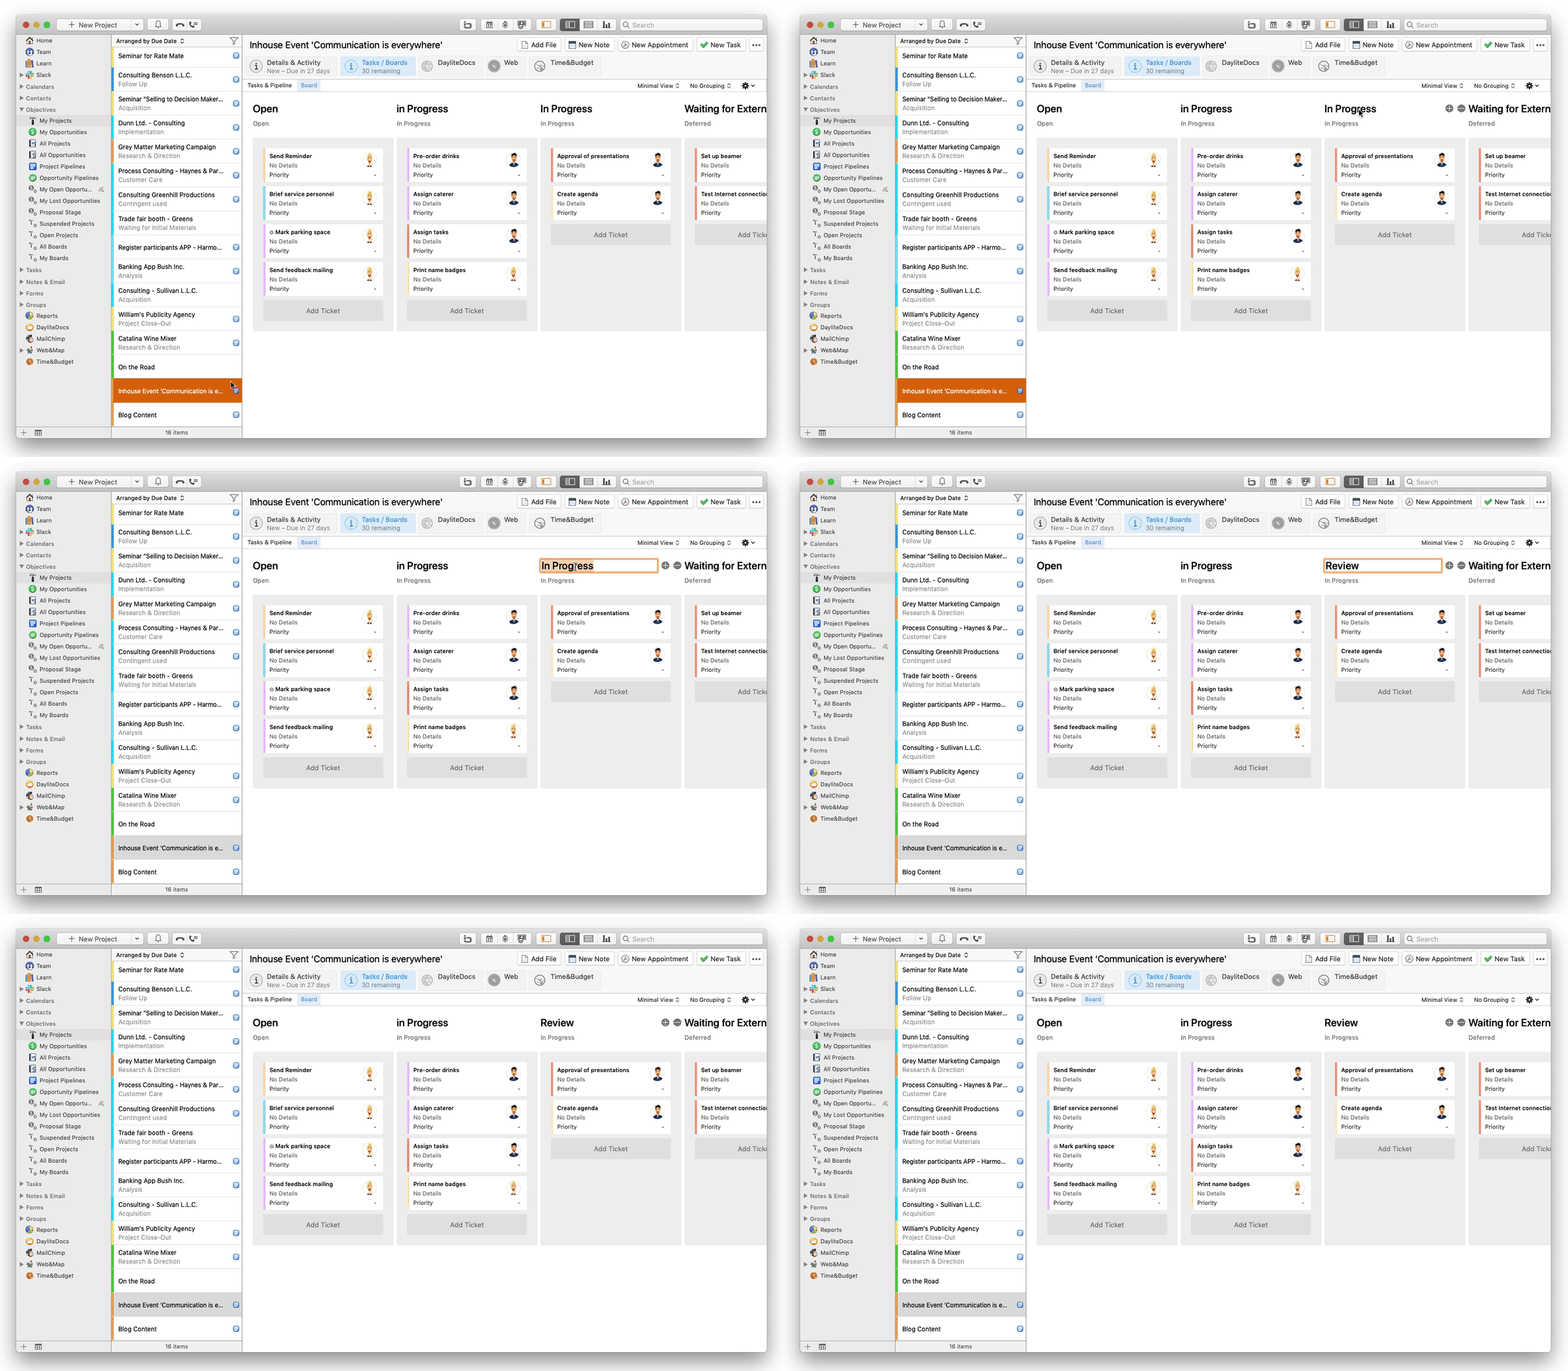
Change the title of the desired column by double-clicking it. The title of the column is above the status of it (example: Status: In Progress, column header: Review). In this editing mask you can also add a description for the respective column. The description is displayed when you move the mouse pointer to the column header.
How do I save and manage templates for Boards?
Use the Daylite plugin Boards to use existing boards as templates for future projects and opportunities. You can also customize the board afterwards by adding or adjusting columns.
Learn how to create a board by reading this article:
How do I create a board?
Saving a board as template
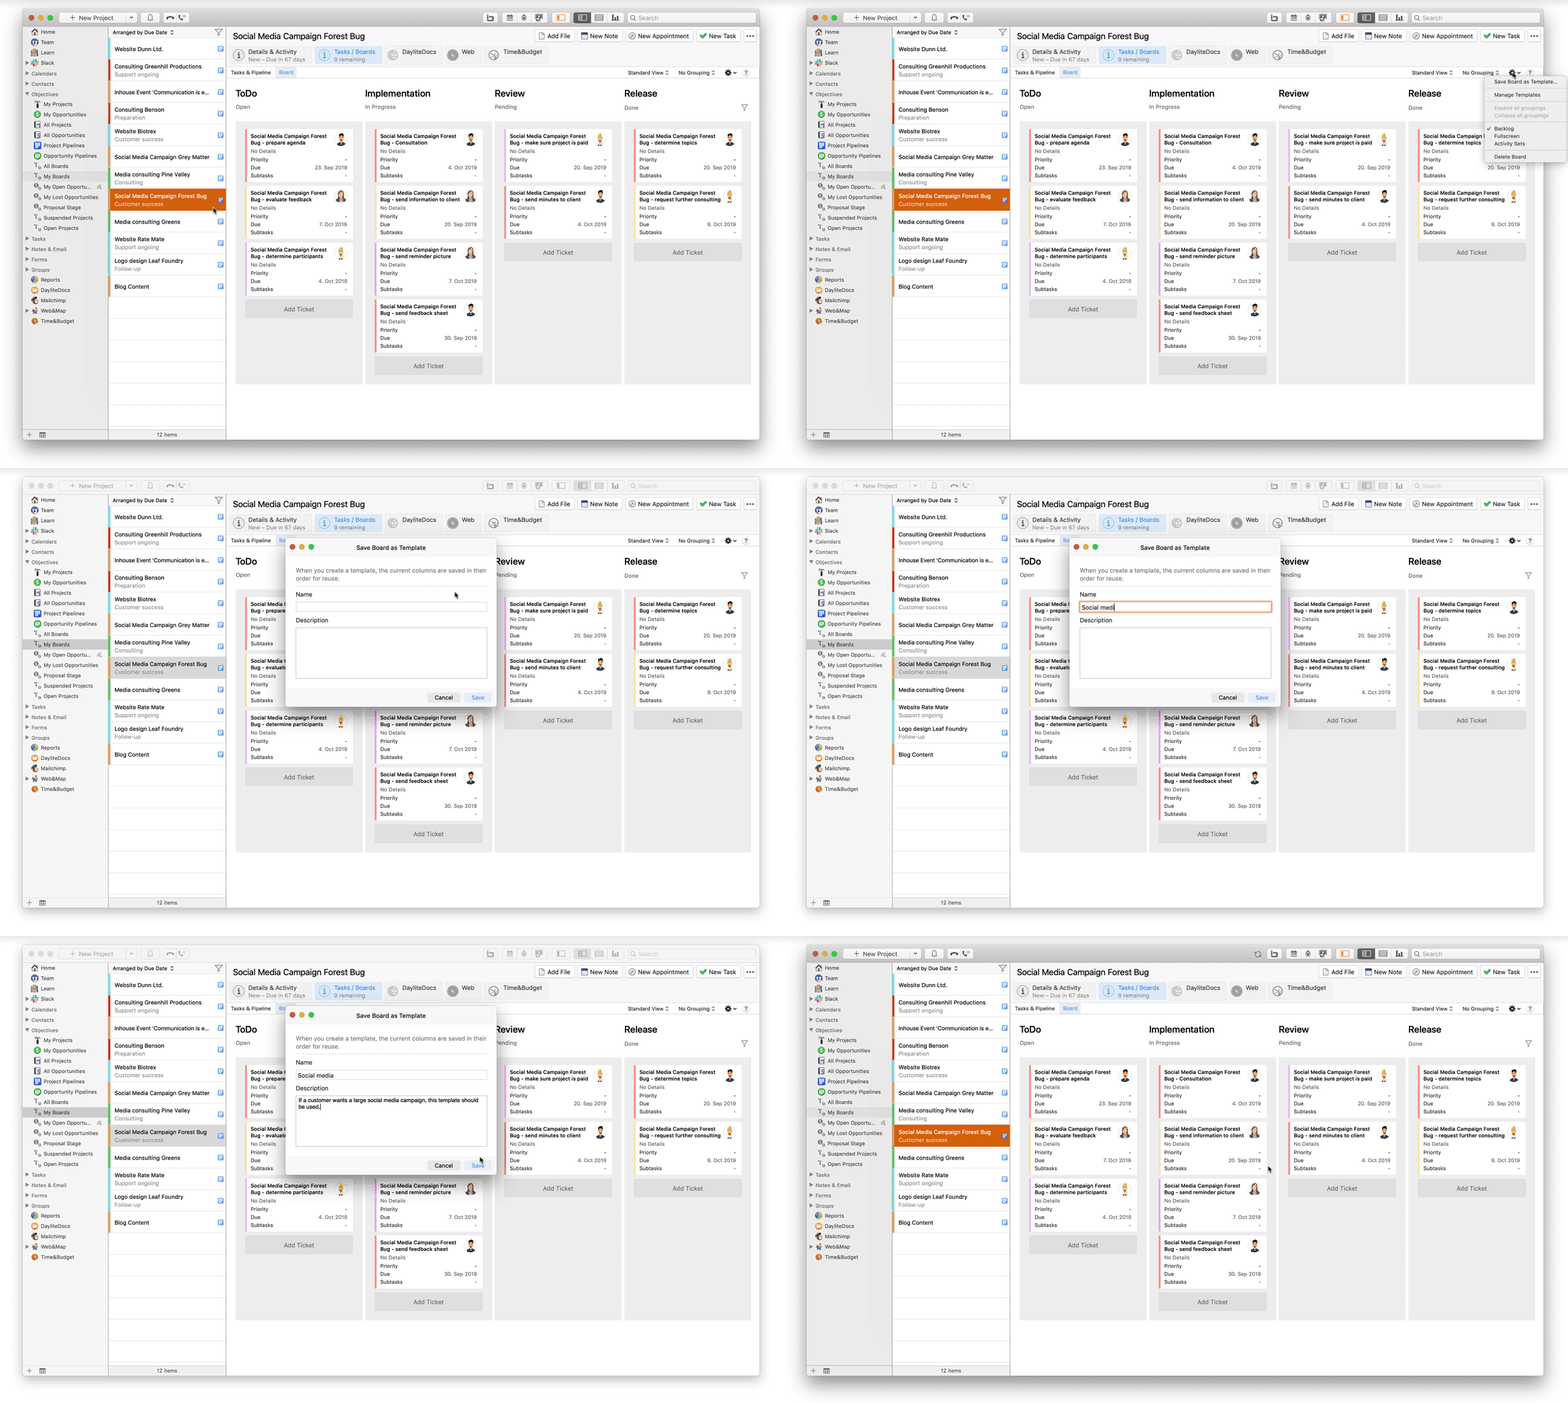
Follow these steps to save a board as template:
- Create a board for a project and opportunity and customize its columns
- Arrange the columns by drag & drop as you like
- Navigate via the gear-icon to Save Board as Template...
- Name the template and describe for what reason it should be used
- Confirm your entry by clicking at Save
You can select the saved template when creating a new board.
Managing board templates
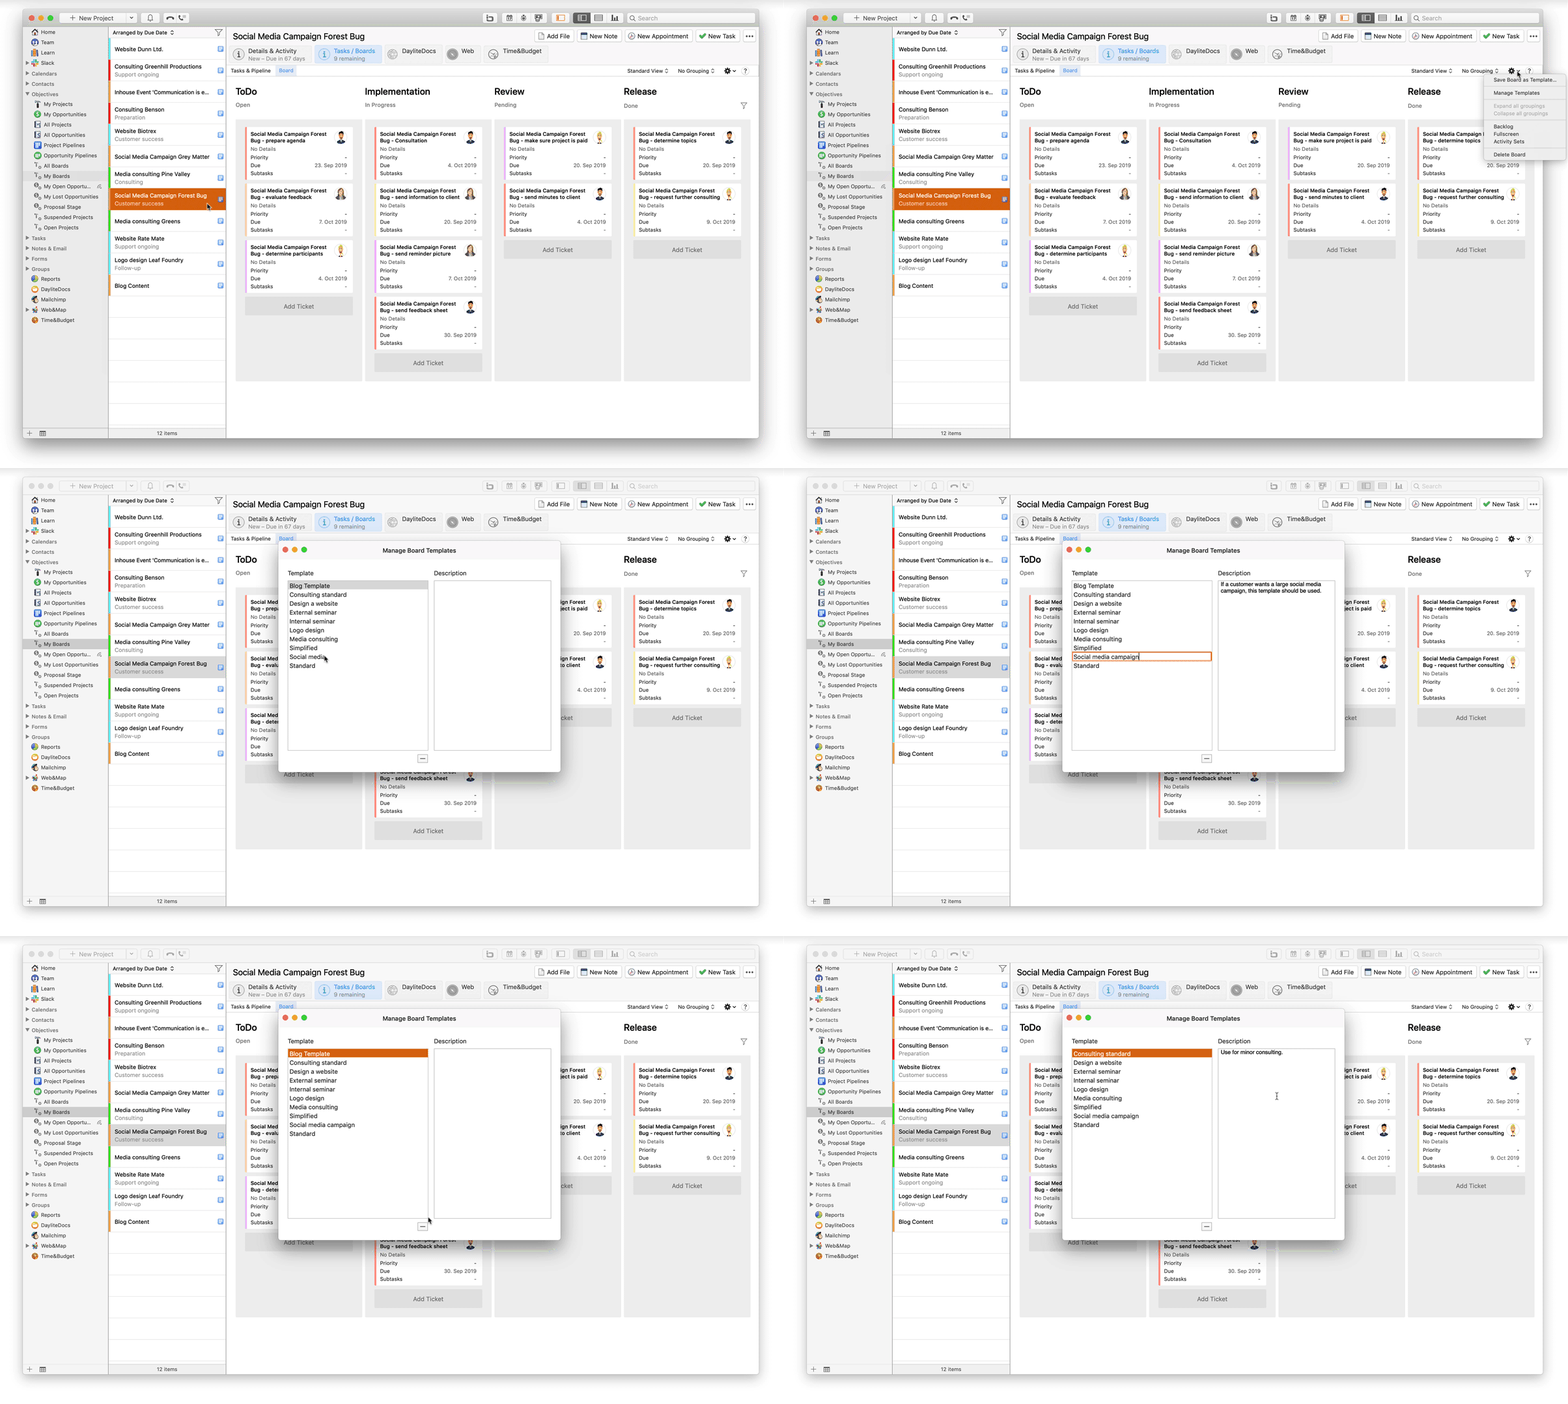
To manage your templates for board, please follow these steps:
- Click on the gear-icon in a board of your choice
- Choose Manage Templates to see all saved templates for Boards
- Remove board templates you don't use any longer via the minus-symbol or rename existing ones by double-clicking on the template name
The Backlog column
What is the column Backlog for in Boards?
Use Kanban boards with the help of the Daylite plugin Boards for your projects and opportunities. Get a better control over your project- and opportunity-related tasks (tickets) and work more efficiently. Use an arbitrary number of columns to get a better overview of your tickets through sub-processes.
Read this article to learn how to adjust columns in Boards:
How do I manage columns in Boards?
How to work with the column Backlog
The Backlog column, which does not represent a task status, is automatically created in each Kanban board. It is a kind of collector column for:
- new tickets
- tickets that don't match another column's status
- tickets that you don't like to assign to a specific status or user yet
When a ticket is moved to the column Backlog, its status is not affected.
Example: When a ticket's status is In Progress, the status remains when it is moved to the column Backlog.
Example of a Use Case for the Backlog Column
You delete a column on your board with a specific status that no other column on your board has — the tasks are moved to the Backlog column.
Canceled tasks are not shown in the backlog.
How to hide the column Backlog temporarily
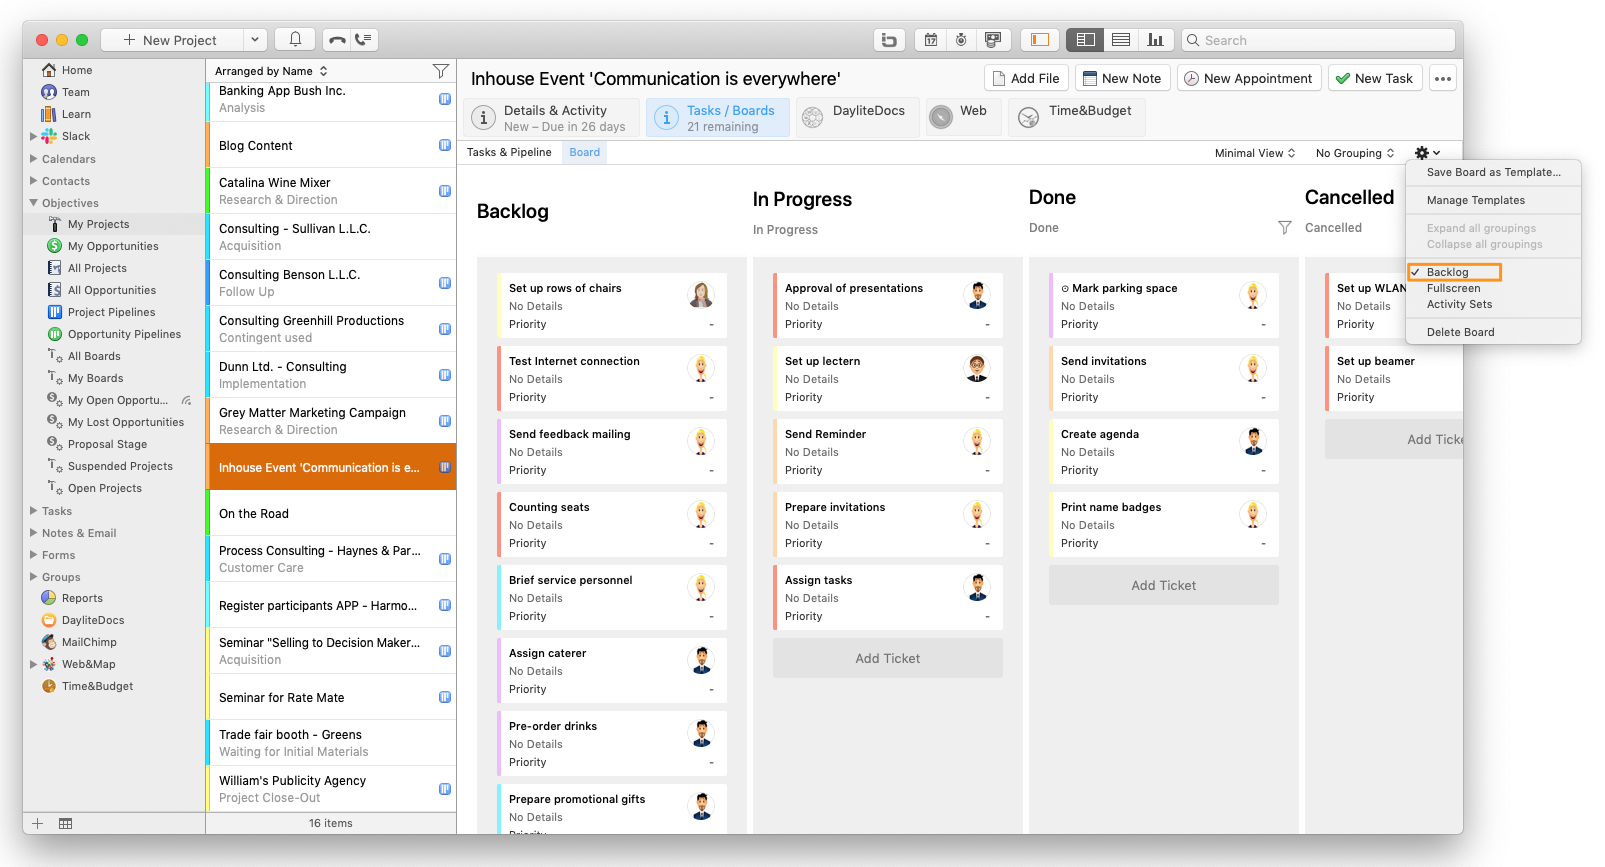
The Backlog column cannot be deleted, but it can be hidden temporarily. When you leave the board and return to it, the formerly hidden Backlog column will show again.
To hide the Backlog column temporarily, please follow these steps:
- Select the Kanban board's cog wheel icon
- Click on Backlog
- The Backlog column is now hidden temporarily
How do I automate the Backlog?
The tickets you created with Boards can also be viewed as regular tasks in Daylite.
If you change the status of the Daylite task from open to another status, the corresponding ticket on your Board will automatically be moved from the column Backlog to the appropriate column of your Board. Just automate your Backlog column for this.
To automate the backlog please follow the steps below:
- Open any Board in Daylite
- In the Board tab click on the gear icon in the upper right corner
- From there, navigate to the Backlog Mode
- Select the Automatic Mode
The backlog mode can be reset to Default at any time.
Tickets: create, delegate and edit
How do I create a ticket in Boards?
Use the visualization of the Daylite plugin Boards to better structure your project and opportunity-related tasks. Tasks are shown as tickets in a Kanban board. Grouping in Boards enables you to use drag & drop to change the status of a ticket, its category, or delegate it to another user in no time.
Get more information about Grouping at this article:
How do I work with grouping in Boards?
Create a ticket in Boards
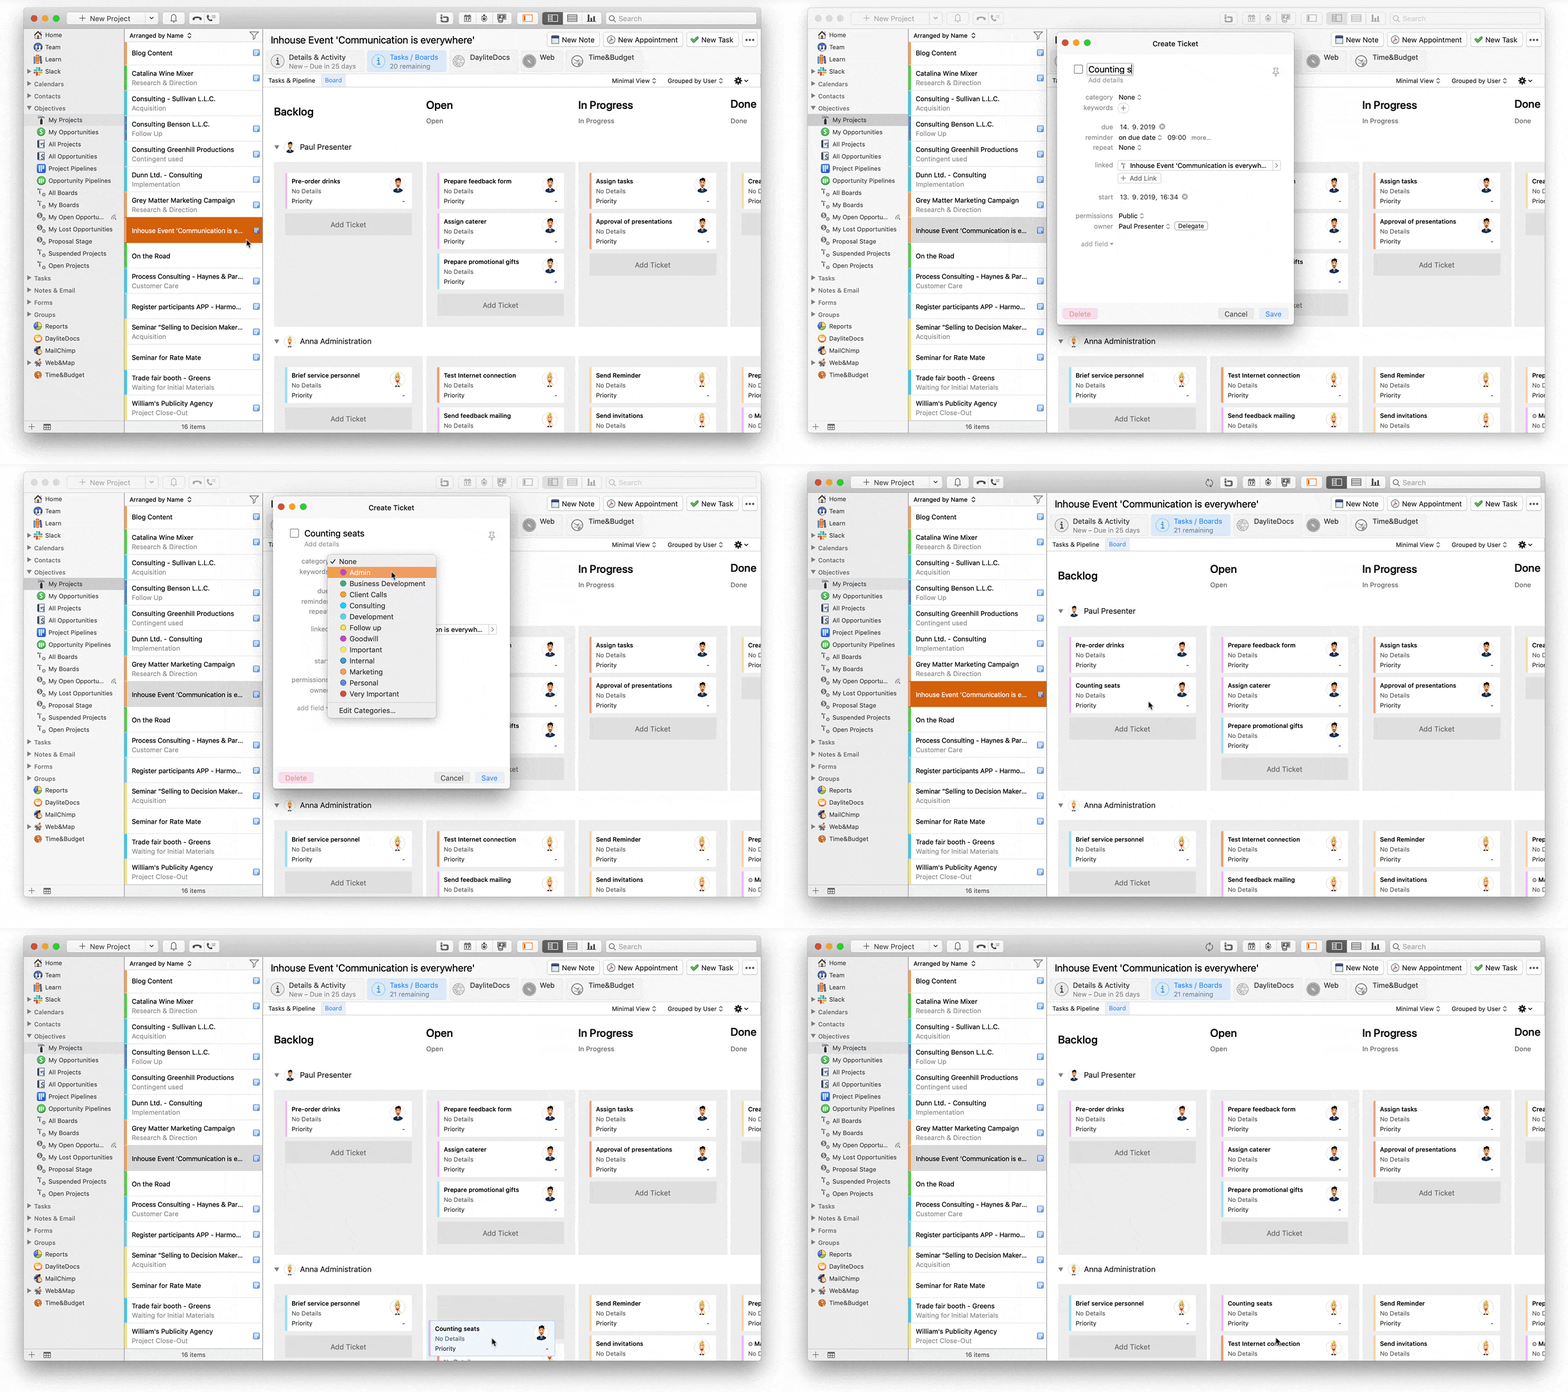
Follow these steps to create a ticket in Boards:
- Select a project or opportunity with a board for which you would like to create a new ticket
- Click the Add Ticket button in the desired column (please note that this button is located beneath possibly existing tickets)
- Add additional information to the ticket such as title, category etc. as desired
- Confirm your entry by clicking Save
You can edit the ticket again at any time or delegate it to another Daylite user.
Learn how to customize columns in a board in this article:
How do I manage columns in Boards?
How can I delegate a ticket in Boards?
Use the visualization of the Daylite plugin Boards to better structure your project and opportunity related tasks. Daylite tasks are shown as tickets on a Kanban Board that is related to your project. Delegate tickets to your team via drag & drop.
How to create a ticket for a board is explained in this article:
How do I create a ticket in Boards?
Delegating a ticket in Boards
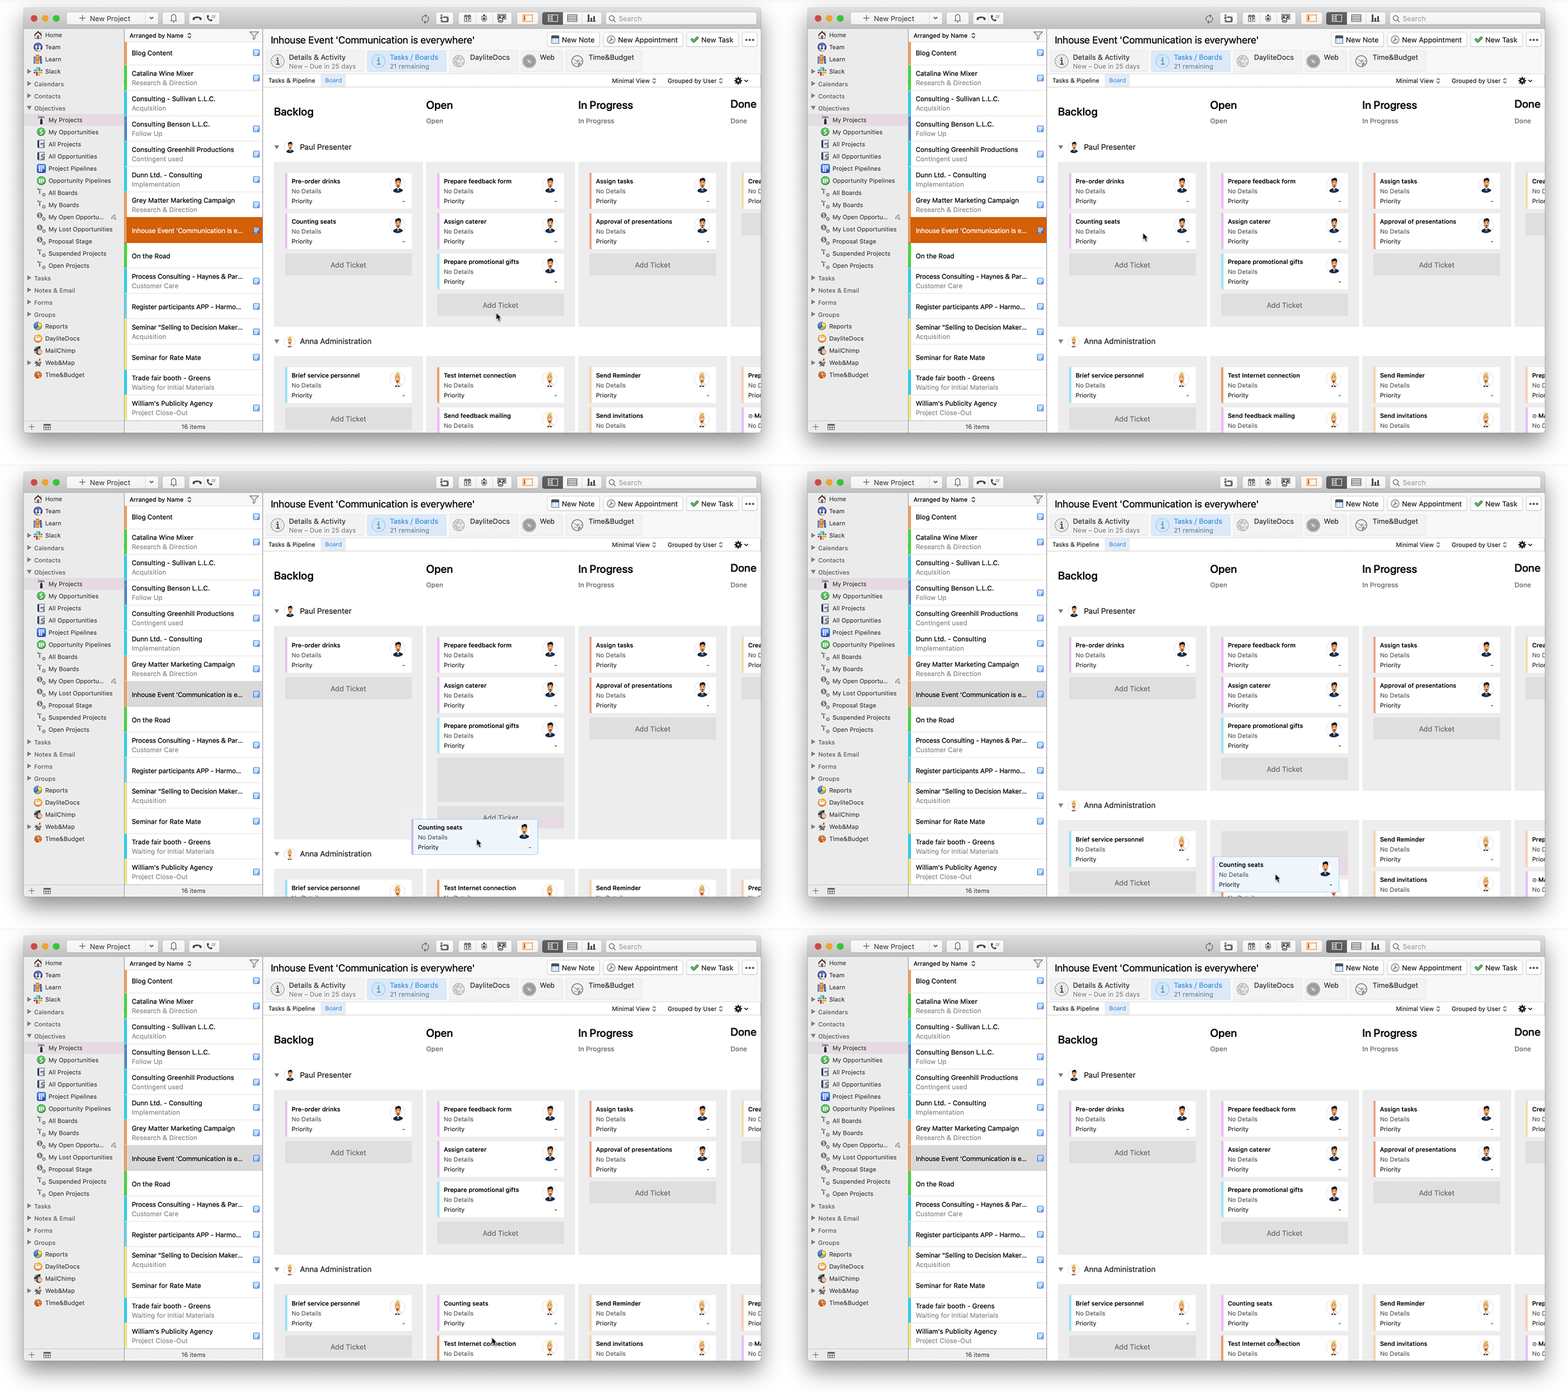
To delegate a ticket in Boards simply click on the ticket's owner icon and select the desired user to delegate the ticket to.
Alternatively, you can also proceed as follows:
- In the upper right-hand part of the Kanban board select No Grouping to access the grouping drop-down menu
- Select Grouped by User from the drop-down menu
- Drag & drop a ticket onto the desired Daylite user's row to delegate
The ticket has now been delegated to the selected user. By default the user receives a notification about this delegation. If the desired user does not show in the board, link this person to this project via the Details & Activity tab in your project.
How do I delete a ticket in a board?
Use the visualization of the Daylite plugin Boards to better structure your project- and opportunity-related tasks. Tasks are shown as tickets in a Kanban board. Grouping in Boards enables you to use drag & drop to delegate a ticket to another Daylite user, change the category or even the ticket's status with ease.
For more information about Grouping, please review this article:
How do I work with grouping in Boards?
Deleting a ticket in Boards
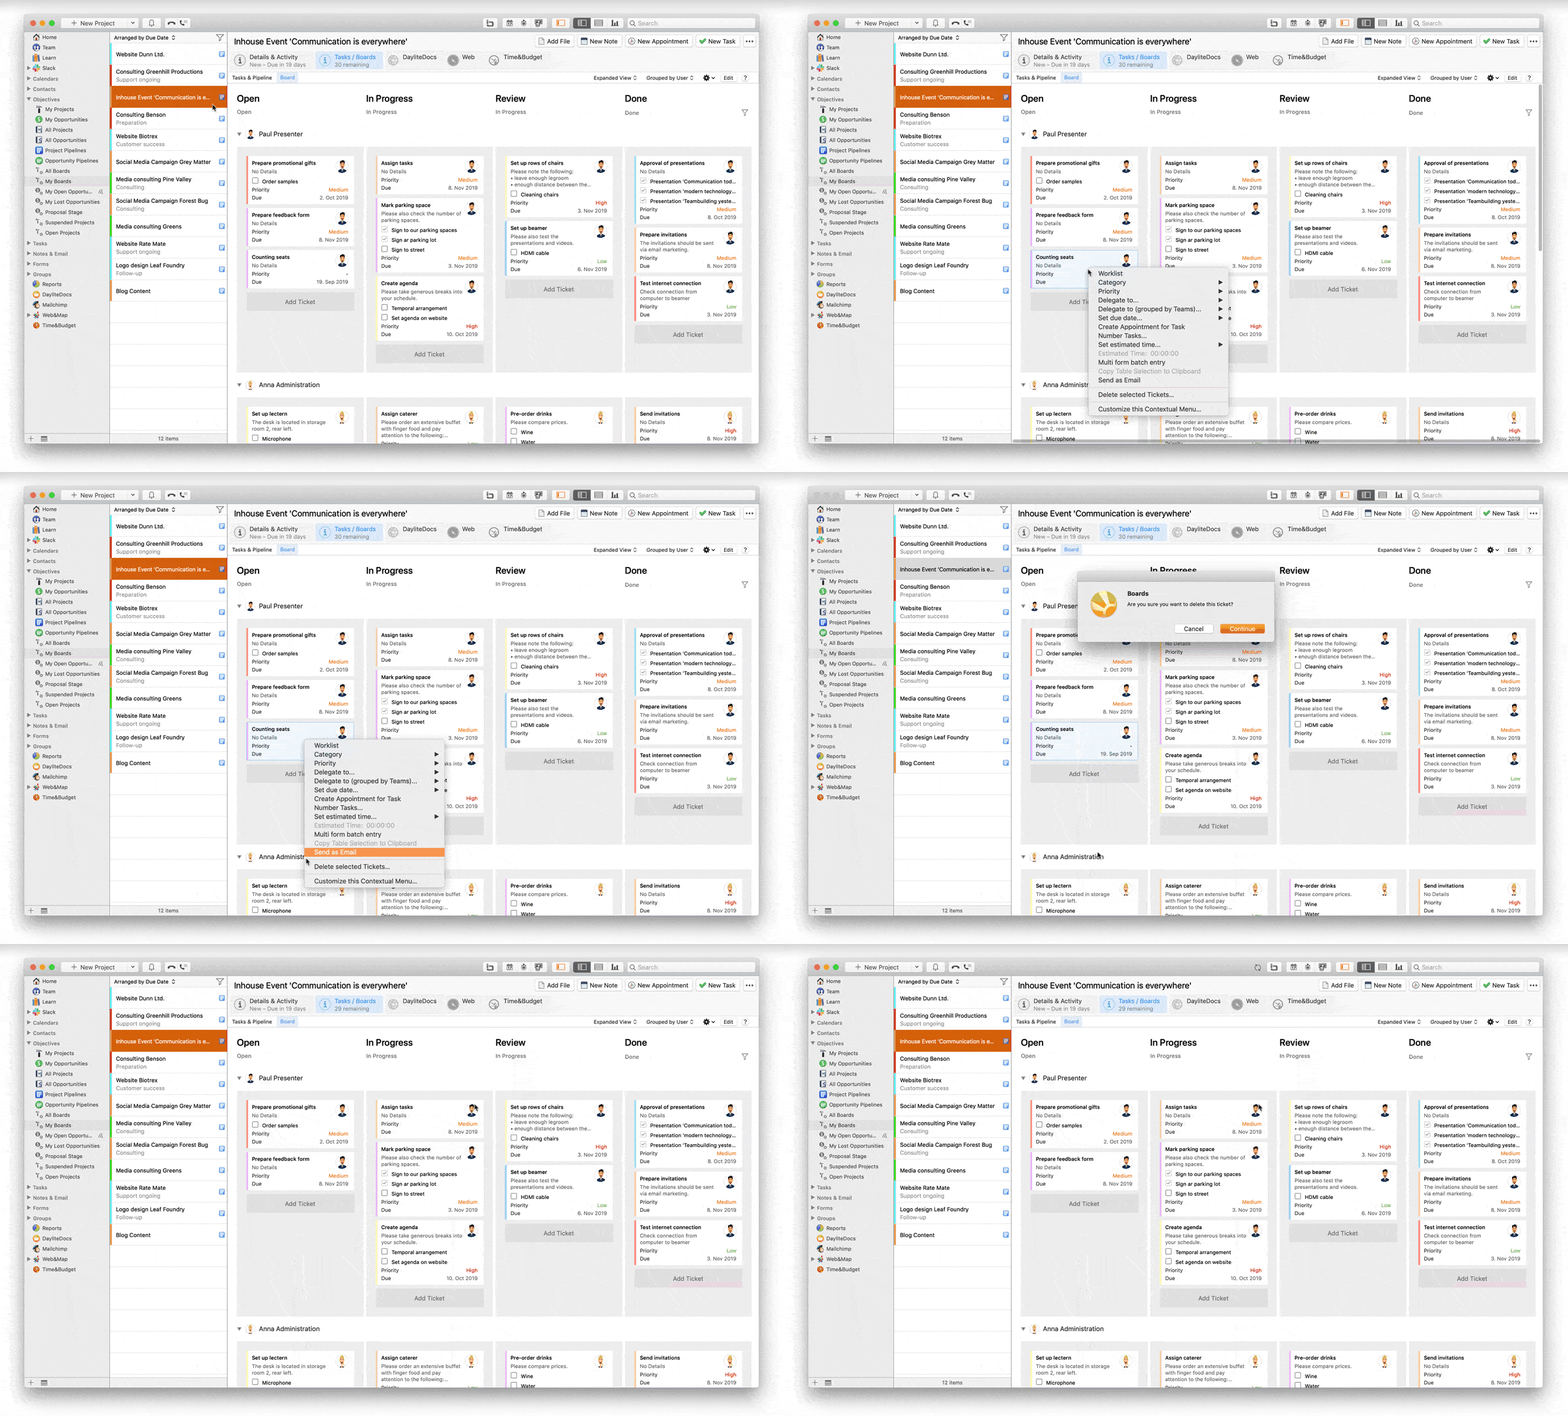
Follow these steps to delete a ticket in Boards:
- Select a project or opportunity with a board in which you would like to delete a ticket
- Navigate to the column on the board where the ticket you would like to delete is shown
- Do a right-click on the ticket and choose Delete selected Tickets...
- Confirm the deletion by clicking Continue
The selected ticket will now be moved to the Daylite trash. The trash can be found in the Daylite menu bar at the top of the screen under Window -> Trash. You can restore the ticket from the trash or delete it permanently.
Can I use subtasks in Boards?
Tasks are the basis of a Kanban-board which you can create with the Daylite plugin Boards. Boards helps you to better structure and visualize your tasks for projects and opportunities. Get an even better overview of your tasks, shown as tickets in a board, by creating subtasks.
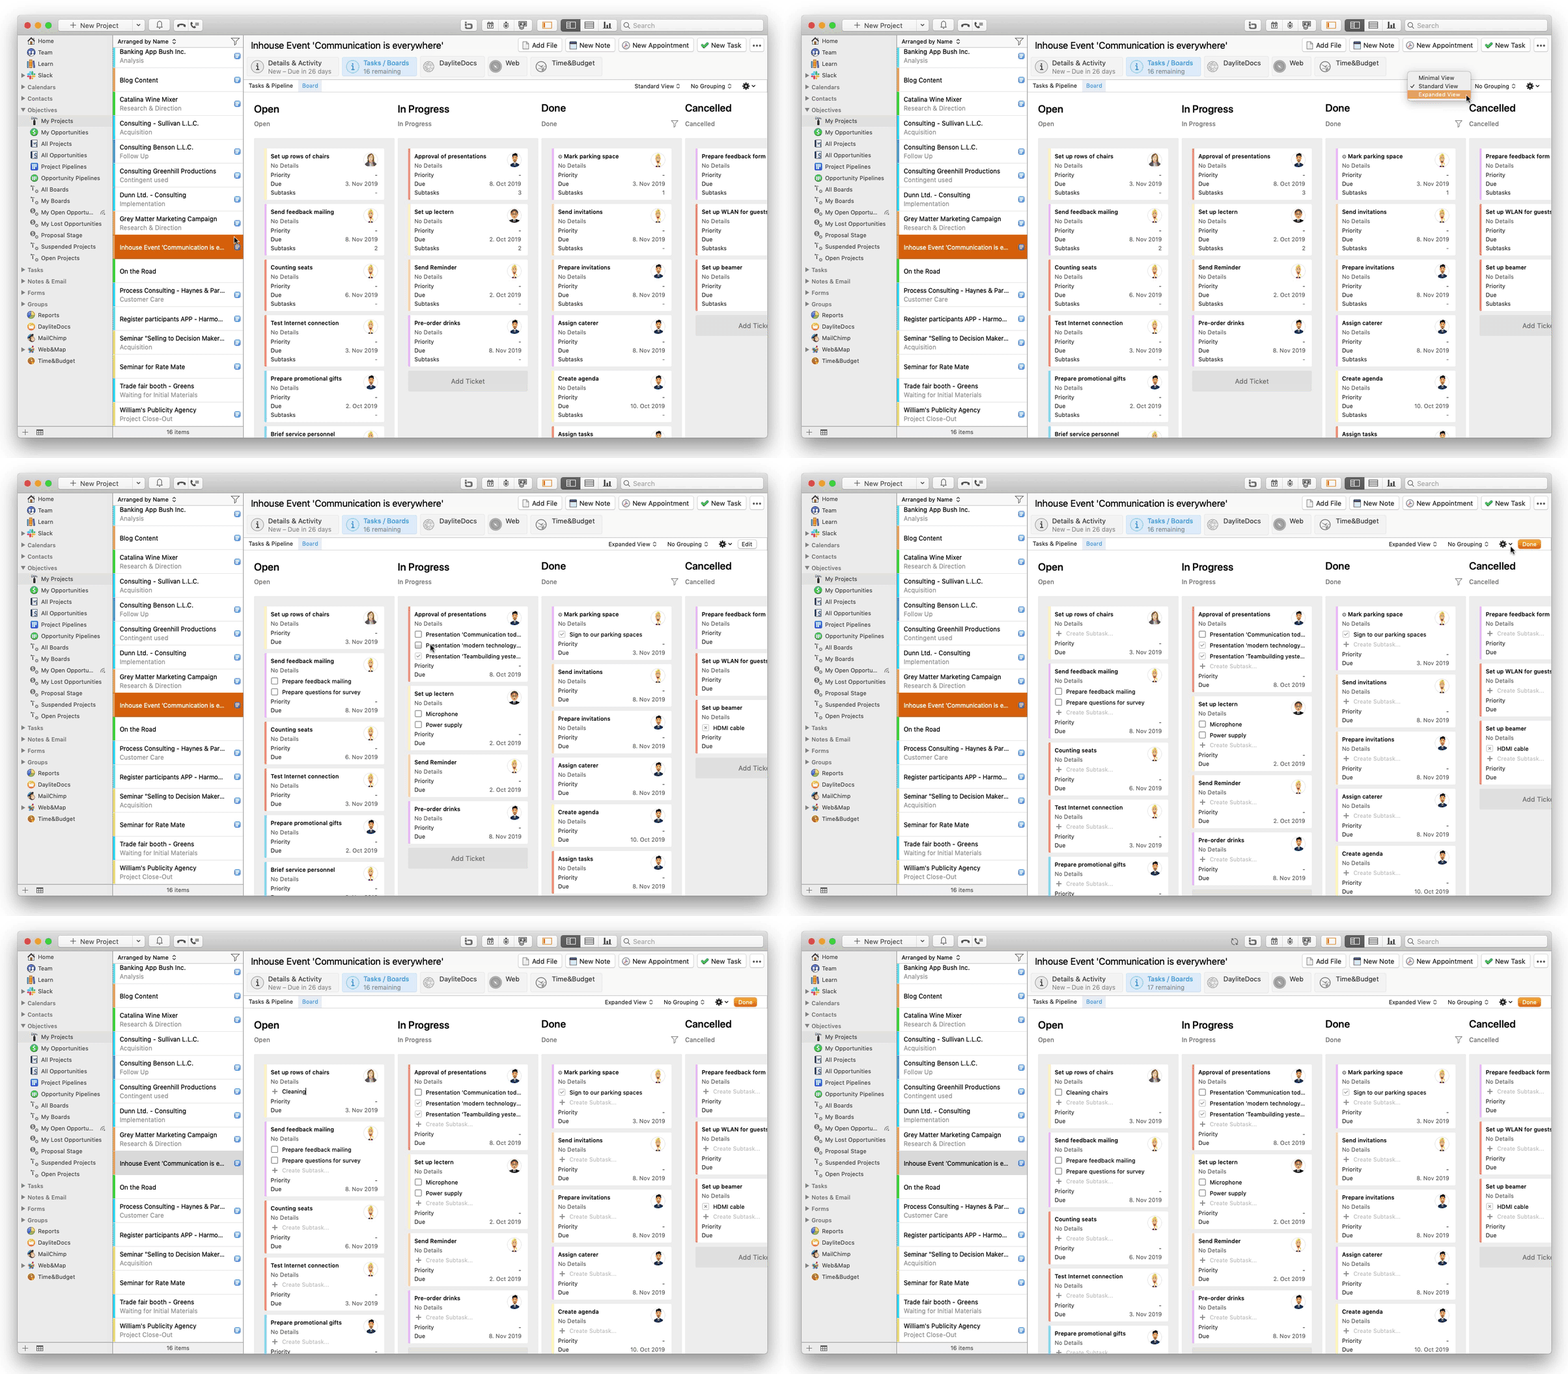
Use the Expanded View to see subtasks per ticket and to edit them in no time.
Learn how different views in Boards will help you to stay on top of your project or opportunity:
What is the difference between Minimal View, Standard View and Expanded View in Boards?
Working with subtasks in Boards
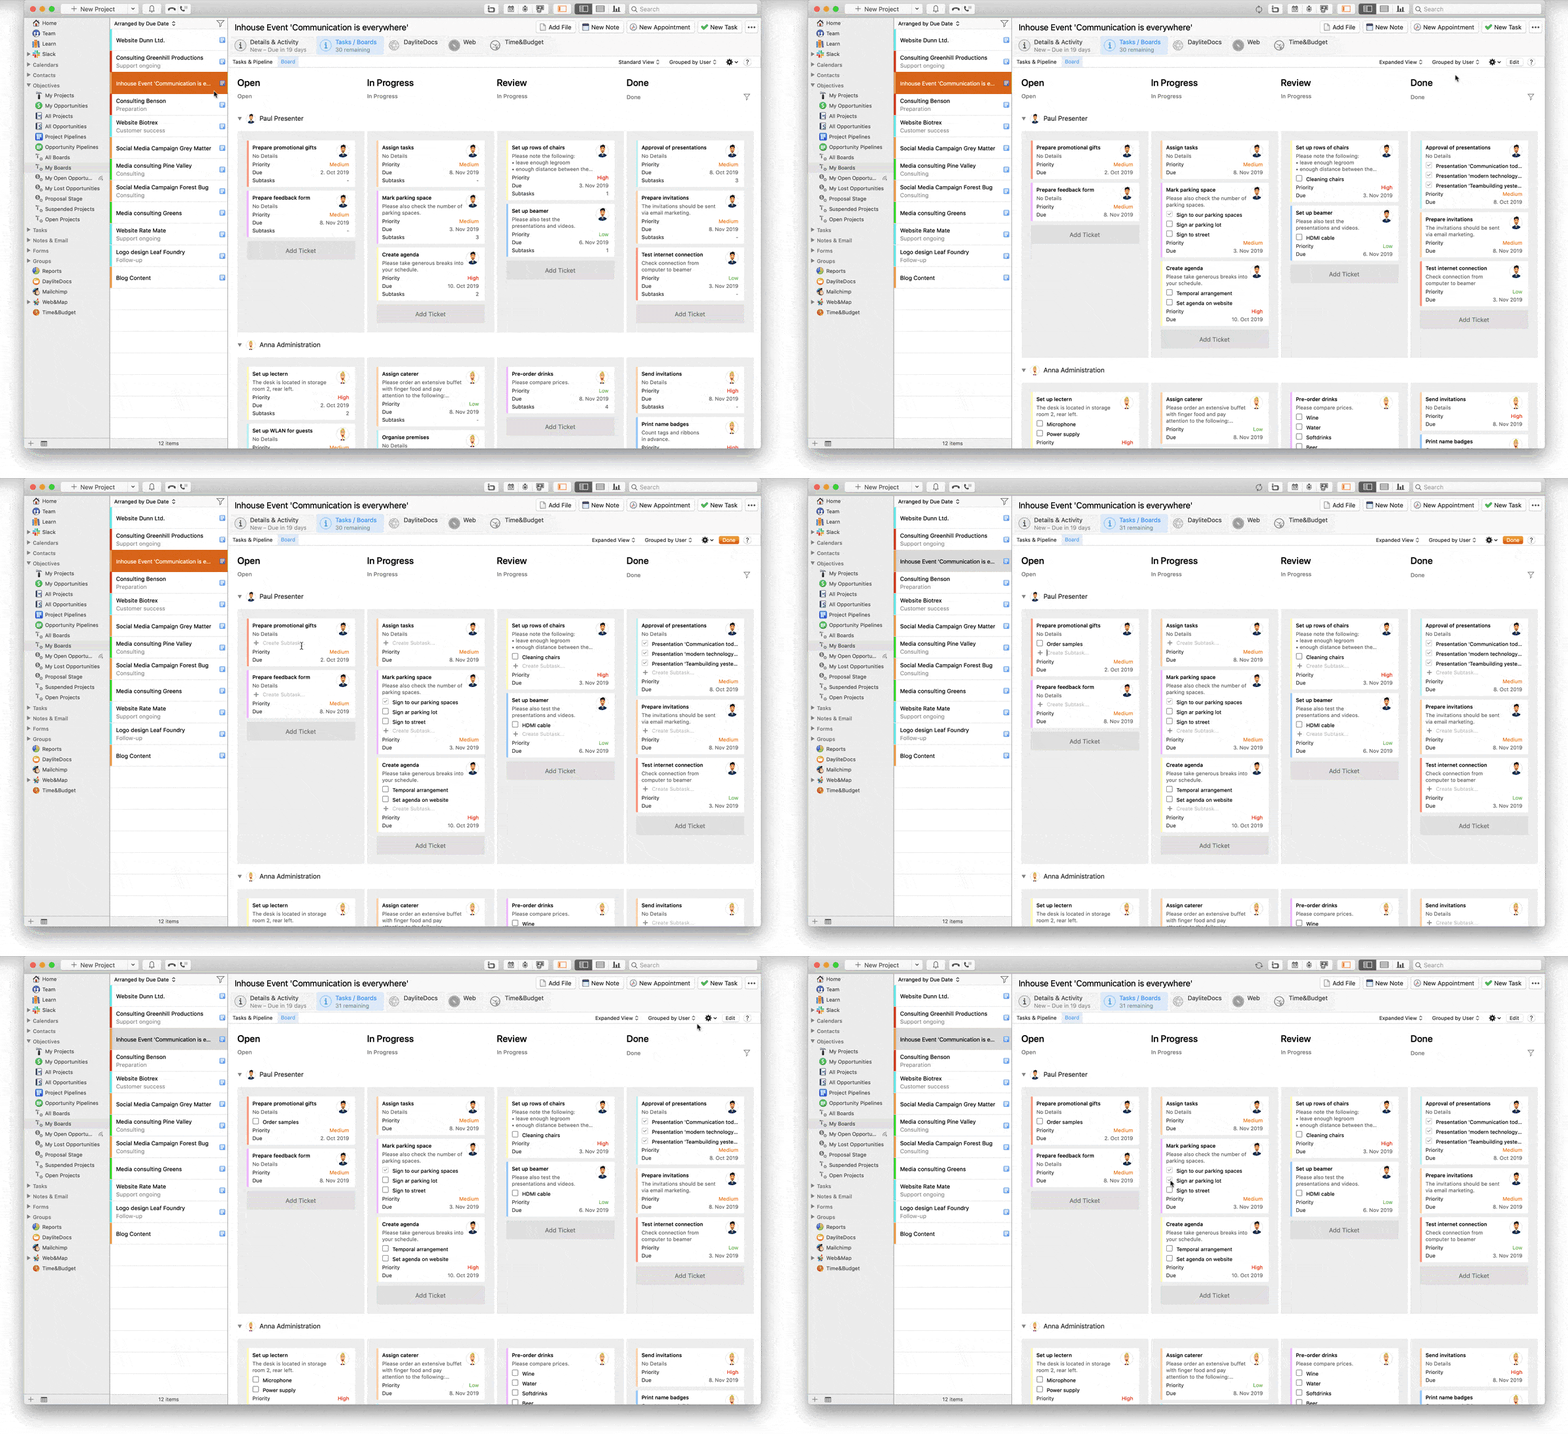
To create a subtask for a ticket in Boards, follow these steps:
- Choose a project or opportunity with an existing board
- Switch to the Expanded View
- Click at the button Edit next to the gear-icon
- Choose a ticket on your board and click at the plus-icon to enter a title for the subtask
- Press the enter key to create the subtask
- When you have created all subtasks, click the button Done
- If needed, you can change the status of the subtasks within the ticket at any time
Managing subtasks when creating a ticket
You can set up subtasks while creating a new ticket in a board. Just follow these steps:
- Click at the button Add Ticket in a column of your choice
- Enter all needed details for the ticket (e.g. title, category)
- If you want to add subtasks for the ticket right away, click New Subtask on the left side in the Subtasks section
- If you'd like to remove a subtask, click at the subtask and press the Backspace [⌫] key
Can I use Activity Sets for Boards?
Use the Daylite plugin Boards for a better control of your projects and opportunities and the visualization of your tasks. See your tasks as tickets on a Kanban board and delegate them to your team via drag and drop. Use activity sets to create a sequence of tasks. Be more flexible by using activity sets within a board.
Learn how to create tasks as tickets by reading this article:
How do I create a ticket in Boards?
Working with Activity Sets in Boards
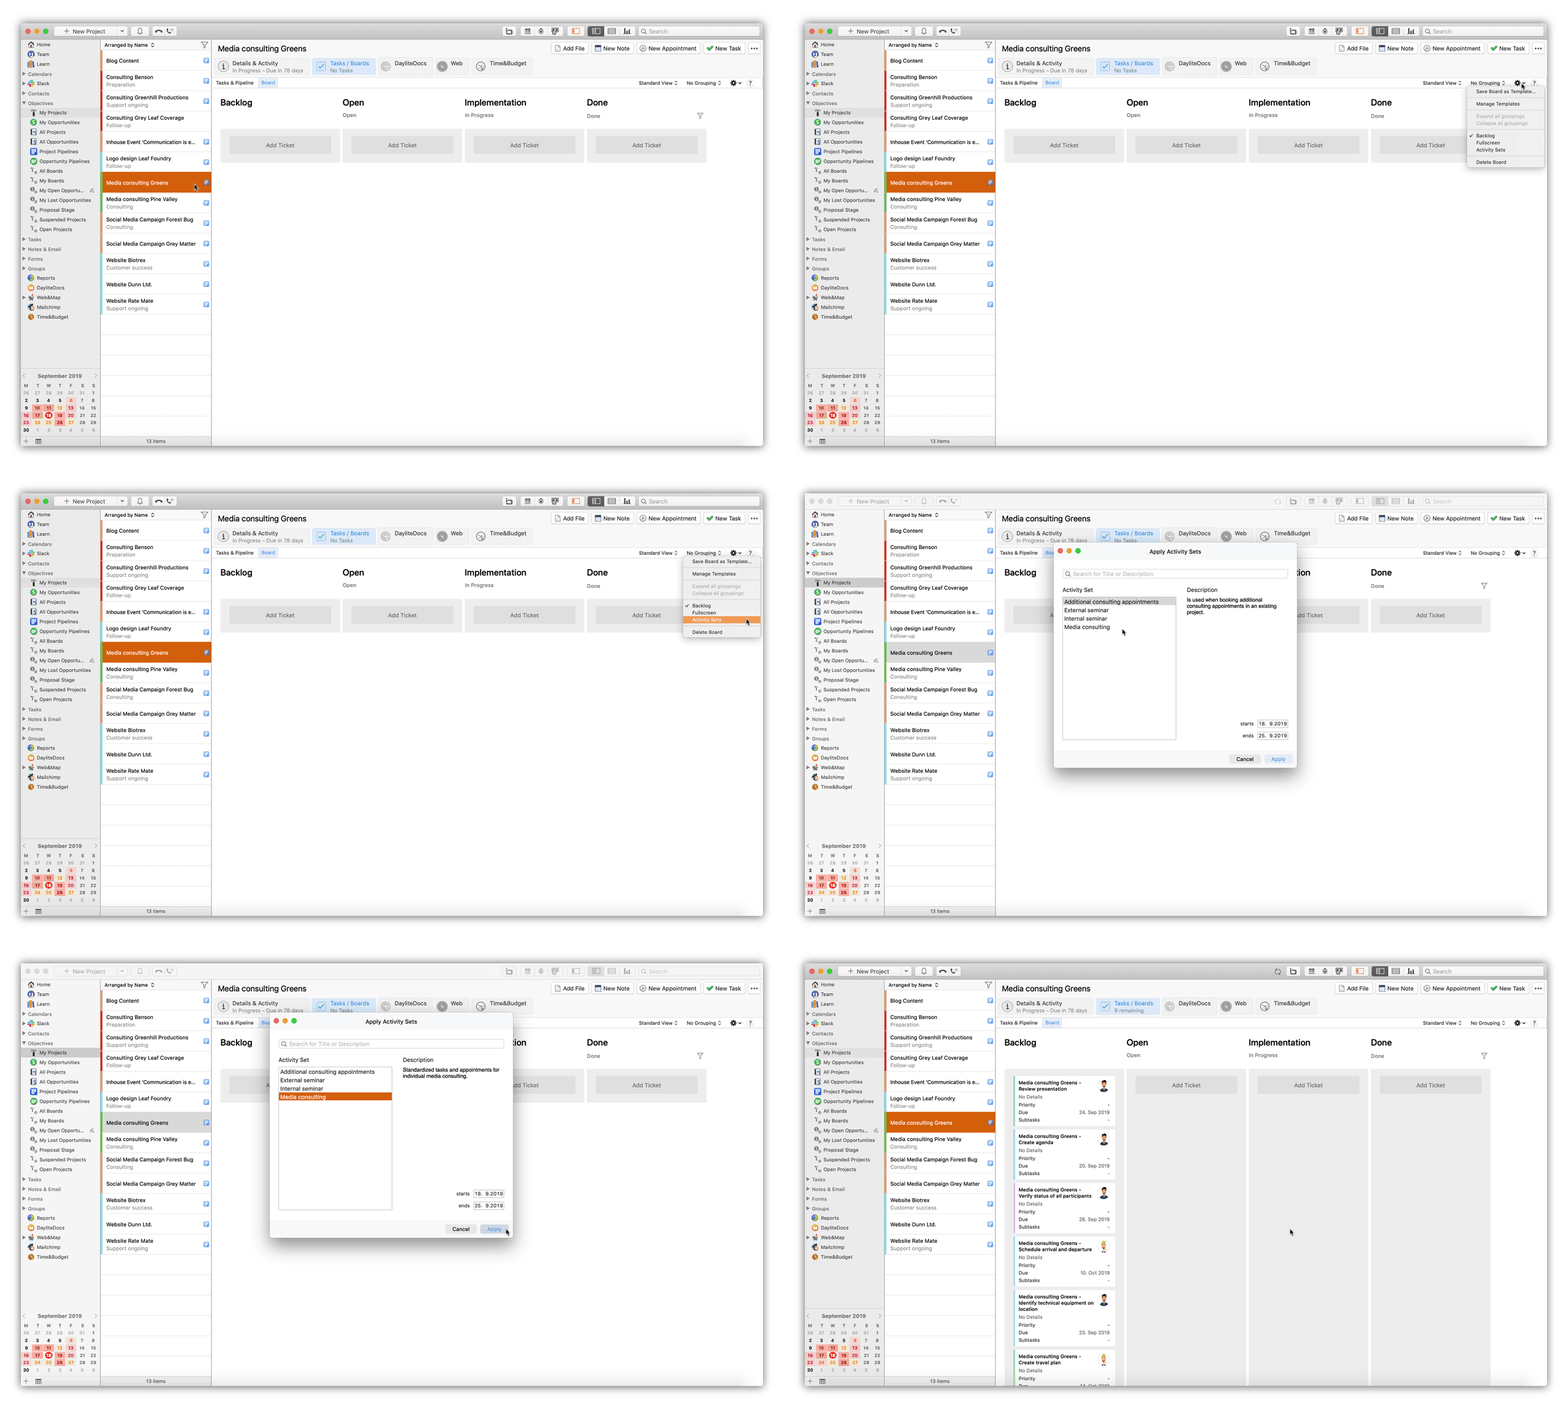
To apply an activity set for your board, please follow these steps:
- Select a project or opportunity with a board for which an activity set should be applied
- Navigate via the gear-icon to Activity Sets
- Search via the search field for the Activity Set's name or description. Click on the search result you would like to apply for the board
- Note: Check and edit the start and end date of the chosen Activity Set if needed by using the fields starts (date) and ends (date)
- Click on the button Apply to use the chosen activity set for the board
The tasks of the activity set are shown as tickets in the Backlog column of the board for the applicable Daylite user. Now, make use of groupings in Boards to perform various actions for the ticket via drag and drop in no time.
Learn how to use groupings in Boards by reading this article:
How do I work with grouping in Boards?
Views, groupings and filters
What is the difference between Minimal View, Standard View and Expanded View in Boards?
Use the Daylite plugin Boards to better organize and structure tasks (tickets) within projects or opportunities. In addition to the different views in boards, you can also use groupings to move tickets within a board using drag & drop. Change the category or priority of the task, or delegate it to another user. Keep track of your project or opportunity in no time.
Use different views of the tickets in a Kanban board to see them from the right angle.
Click here to find out how groupings can help you work even more efficiently with boards:
How do I work with grouping in Boards?
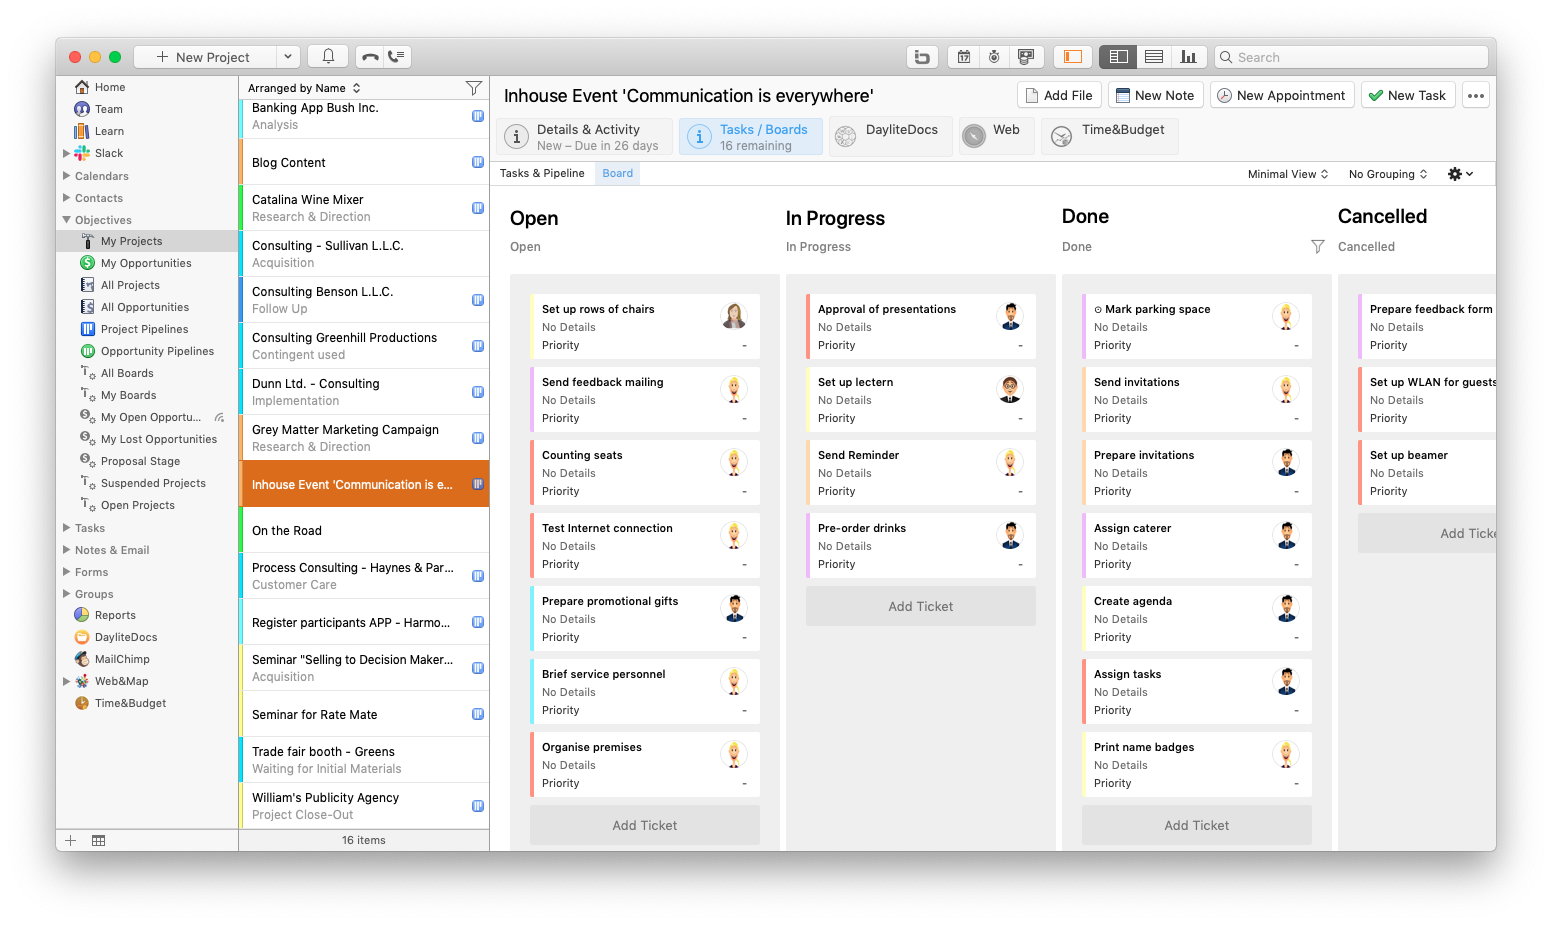
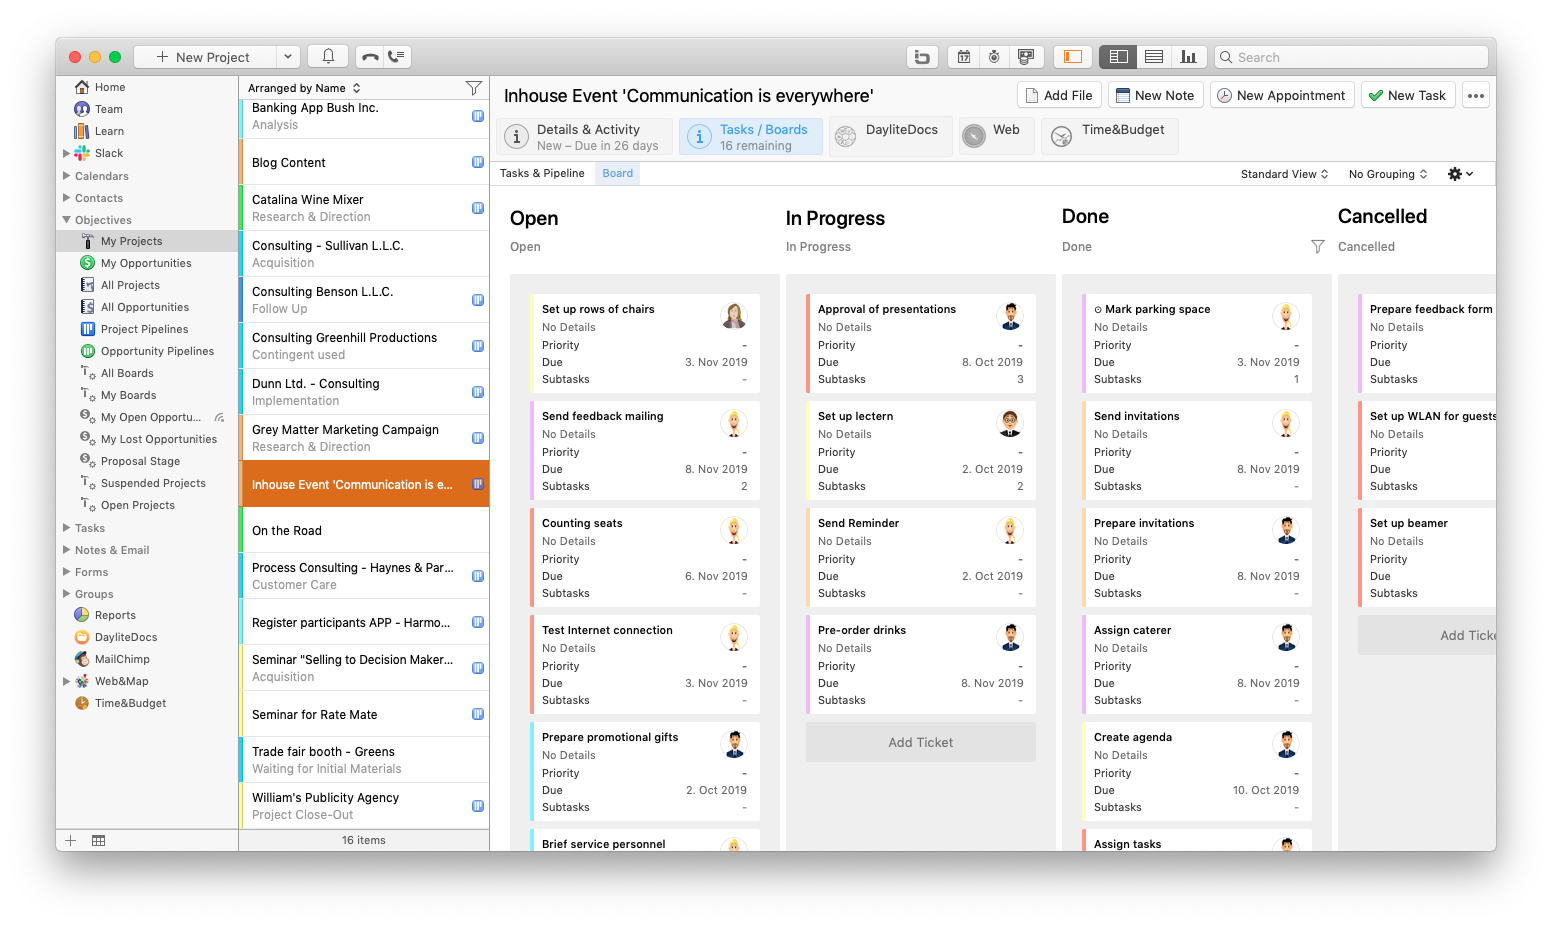
Minimal View
This view shows you the title, category, priority and a ticket's details. The length of the task title and detail text is limited to two lines when using this view.
Standard View
In this view, you see the due date and the number of subtasks in addition to the information from the Minimal View. The length of the task title and the detail text is limited to three lines. Additionally, links are displayed at the bottom. These are added into the details or the location field. The links are immediately clickable in the board view.
Expanded View
In addition to the information from the Minimal and Standard View, subtasks of a ticket are displayed. The subtasks can be set to status Done or Cancelled directly in the ticket. As soon as you click the Edit button, you can create new subtasks within the ticket. The links are added into the details or the location field. The links are immediately clickable in the board view.
Limit the number of shown tickets
Boards makes it easy to limit the number of shown tickets per column. If you don't group a board, you will see a maximum of 12 tickets per column. With this, it's easier to keep an overview.
If you wish to see more tickets, just click at Show more at the bottom of the column. Use Show less to switch back to the previous view.
When you use groupings in Boards, you will automatically see a maximum of 6 tickets per column. Here you can also use Show more and Show less to change the amount of shown tickets.
How do I work with grouping in Boards?
Create Kanban boards for your projects and opportunities with the Daylite plugin Boards and get a better control and visualization of your tasks (tickets). In addition to columns within a board, use different groupings to get different perspectives on your tickets or to move them by drag & drop.
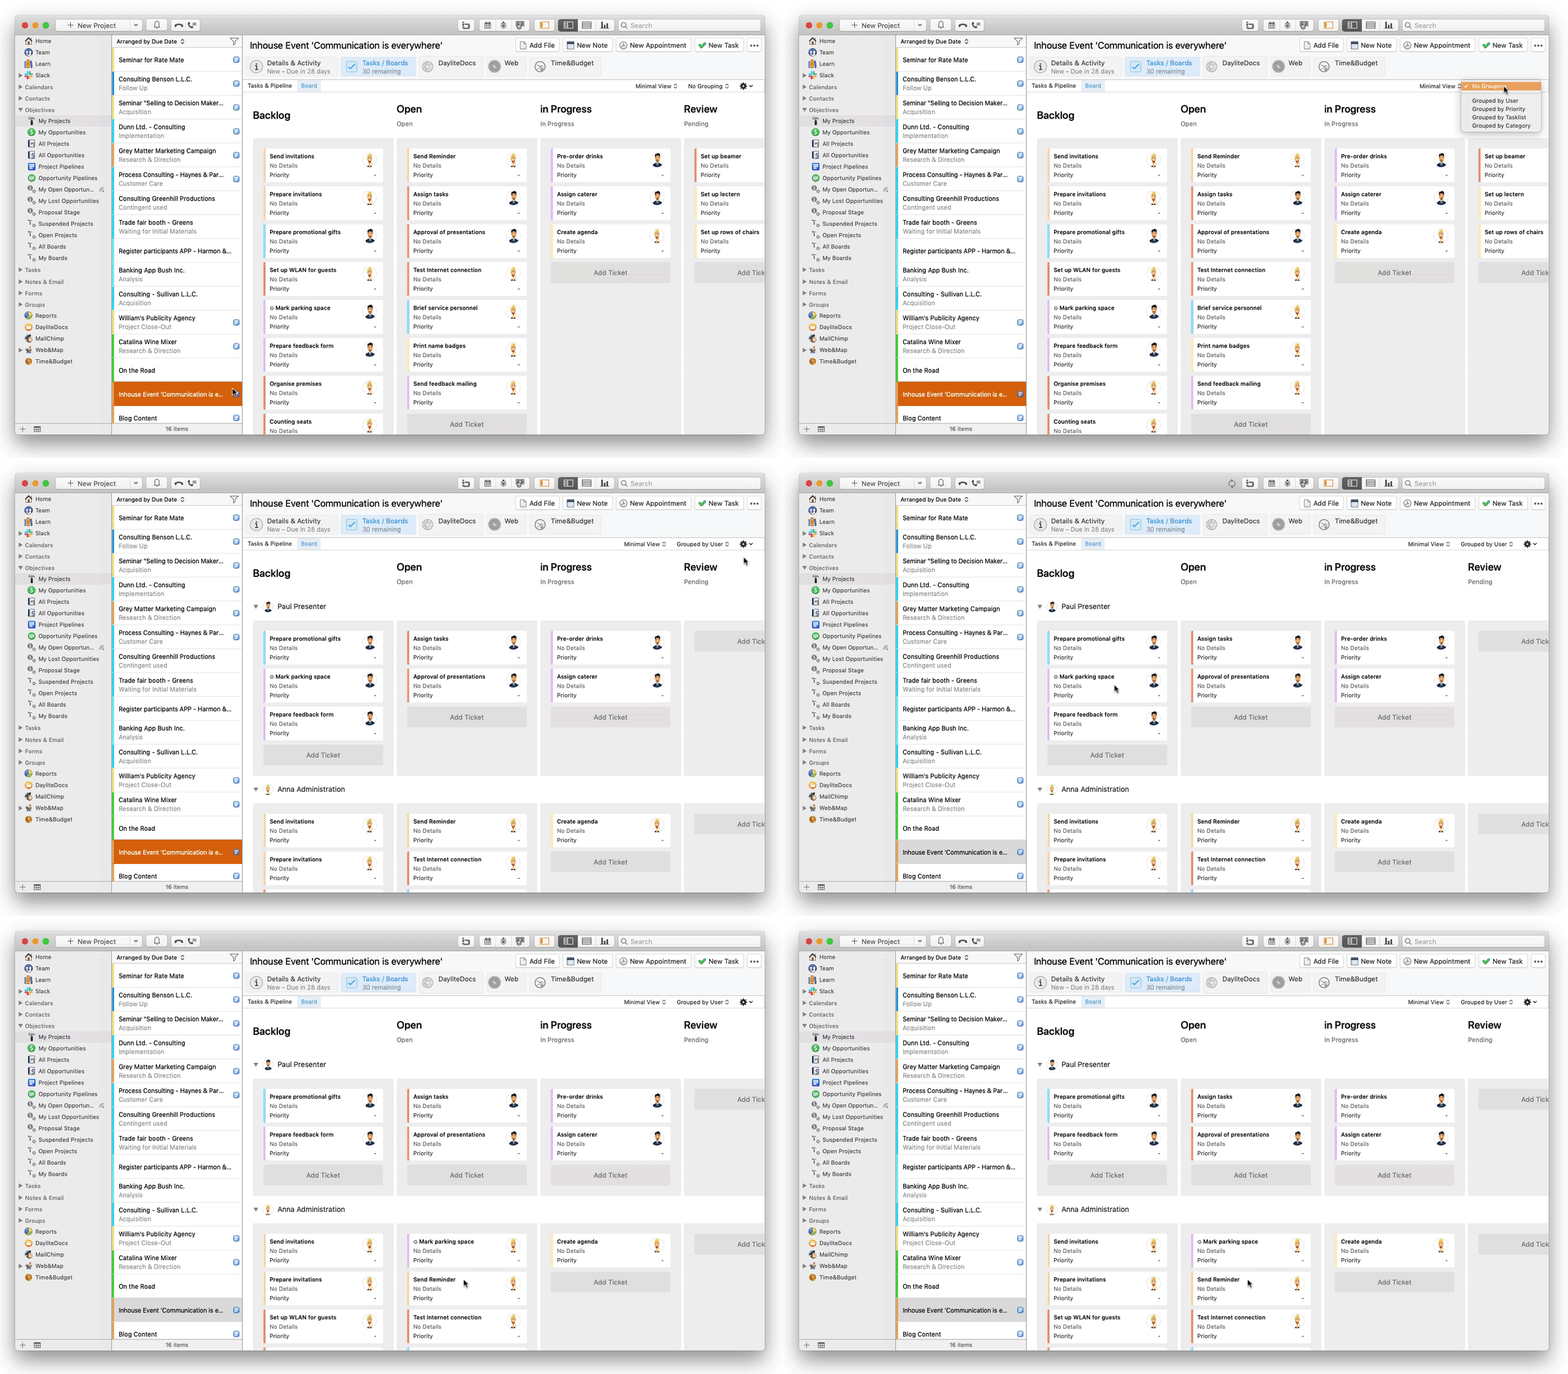
Grouping in Boards
-
Grouped by User
Get an overview of all tickets per user that are related to a project or opportunity. Drag and drop one or more tickets to delegate them to a Daylite user within Boards in no time. -
Grouped by Priority
Group all tickets of a project or opportunity according to their priority. Drag & drop one or more tickets to quickly change the priority. -
Grouped by Tasklist
Create task lists for a project or opportunity on the Tasks & Pipeline tab of your project or opportunity. Group your tickets within the Kanban board according to these task lists and drag & drop tickets to move them in no time.
If a task doesn't originate from a task list, it will be displayed in the row "No tasklist". -
Grouped by Category
Group tickets by category. Drag & drop a ticket to change the category.
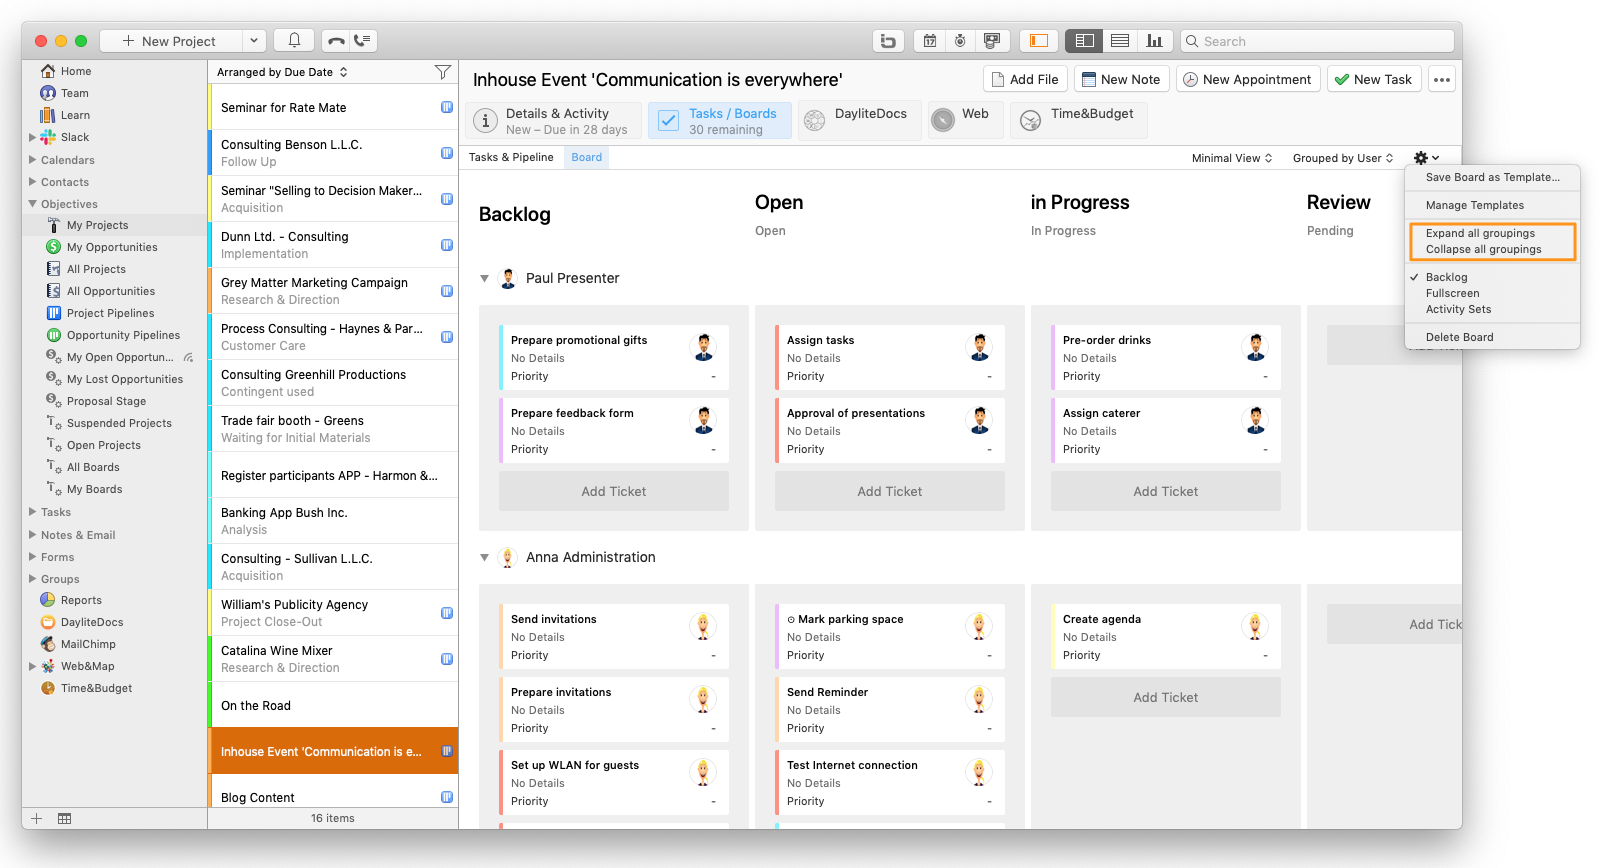
Use the gear-icon to open the settings of the selected board and expand or collapse all groupings with a single click.
How do I use the search function in boards?
You can now use the search function in Boards to search for the title of the ticket or just parts of the title.
The results are highlighted in green and are therefore easier to recognize.
How can I filter in a board?
Create Kanban boards for your projects and opportunities with the Daylite plugin Boards to get a better control and visualization of your tasks (tickets). Boards lets you filter the columns Done and Cancelled so only the most recent completed or canceled tickets are shown.
Find out how to see in no time for which projects and opportunities a board has already been created:
How do I know that a board has been created?
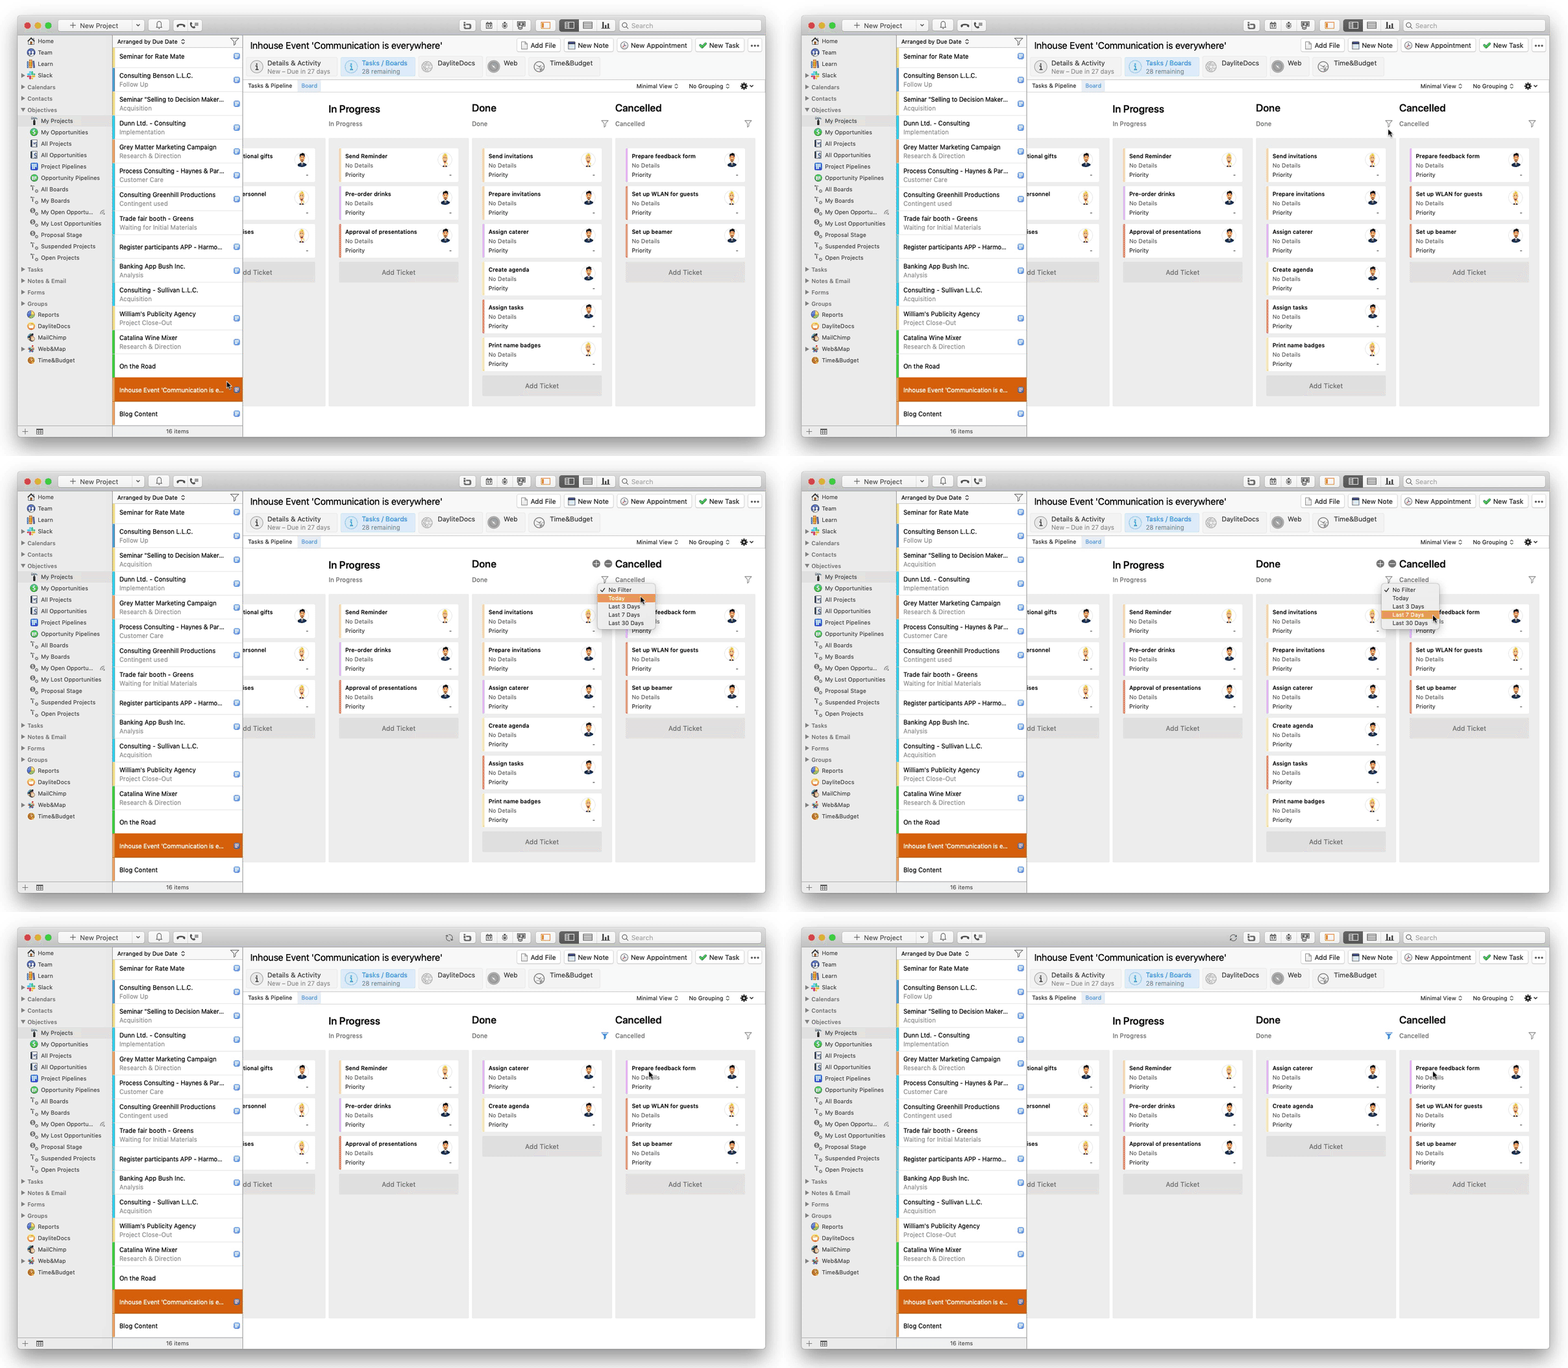
How to filter in a board
To filter in a board, please proceed as follows:
- Choose a project or opportunity in Daylite that already contains a board
- Select the tab Tasks / Boards -> Board (alternatively click the Boards icon next to integrations)
- Click the filter icon displayed above the columns Done and Cancelled
- Select a time period for which tickets should be shown in the corresponding columns (example: column with task status Done, period Last 7 days)
Board types and navigation
What are Group Boards?
You can also create a Kanban Board for groups in Daylite. If you subordinate several projects to a group by linking them to the group, you will see all cross-project tasks on one board.
This gives you an overview at any time of which state the individual tasks, displayed as tickets, are in and which colleague is working at what capacity.
To create a board for a group, proceed as follows:
- Select a group in Daylite and link it to related projects whose tasks should be displayed together on one board
- Click on the tab Tasks/Boards -> Create Board -> Create a Board
- Select a template (e.g. Standard) and confirm your selection by clicking Save
Learn how to add columns to your board or group it by reading these articles:
How do I manage columns in Boards?
How do I work with grouping in Boards?
Is there a full screen mode for Boards?
Create Kanban boards with the Daylite plugin Boards for your projects and opportunities to get better control over your project and opportunity related tasks (tickets). Use the visualization of your tickets to stay on top of things.
To work more efficiently with Boards, it is possible to open a project or opportunity Kanban board in full screen mode, parallel to the Daylite main window.
This turns your board into its own window allowing you to position it anywhere you like. You can even set up multiple board windows and assign them to individual displays!
Get to know how to create a board by reading this article:
How do I create a board?
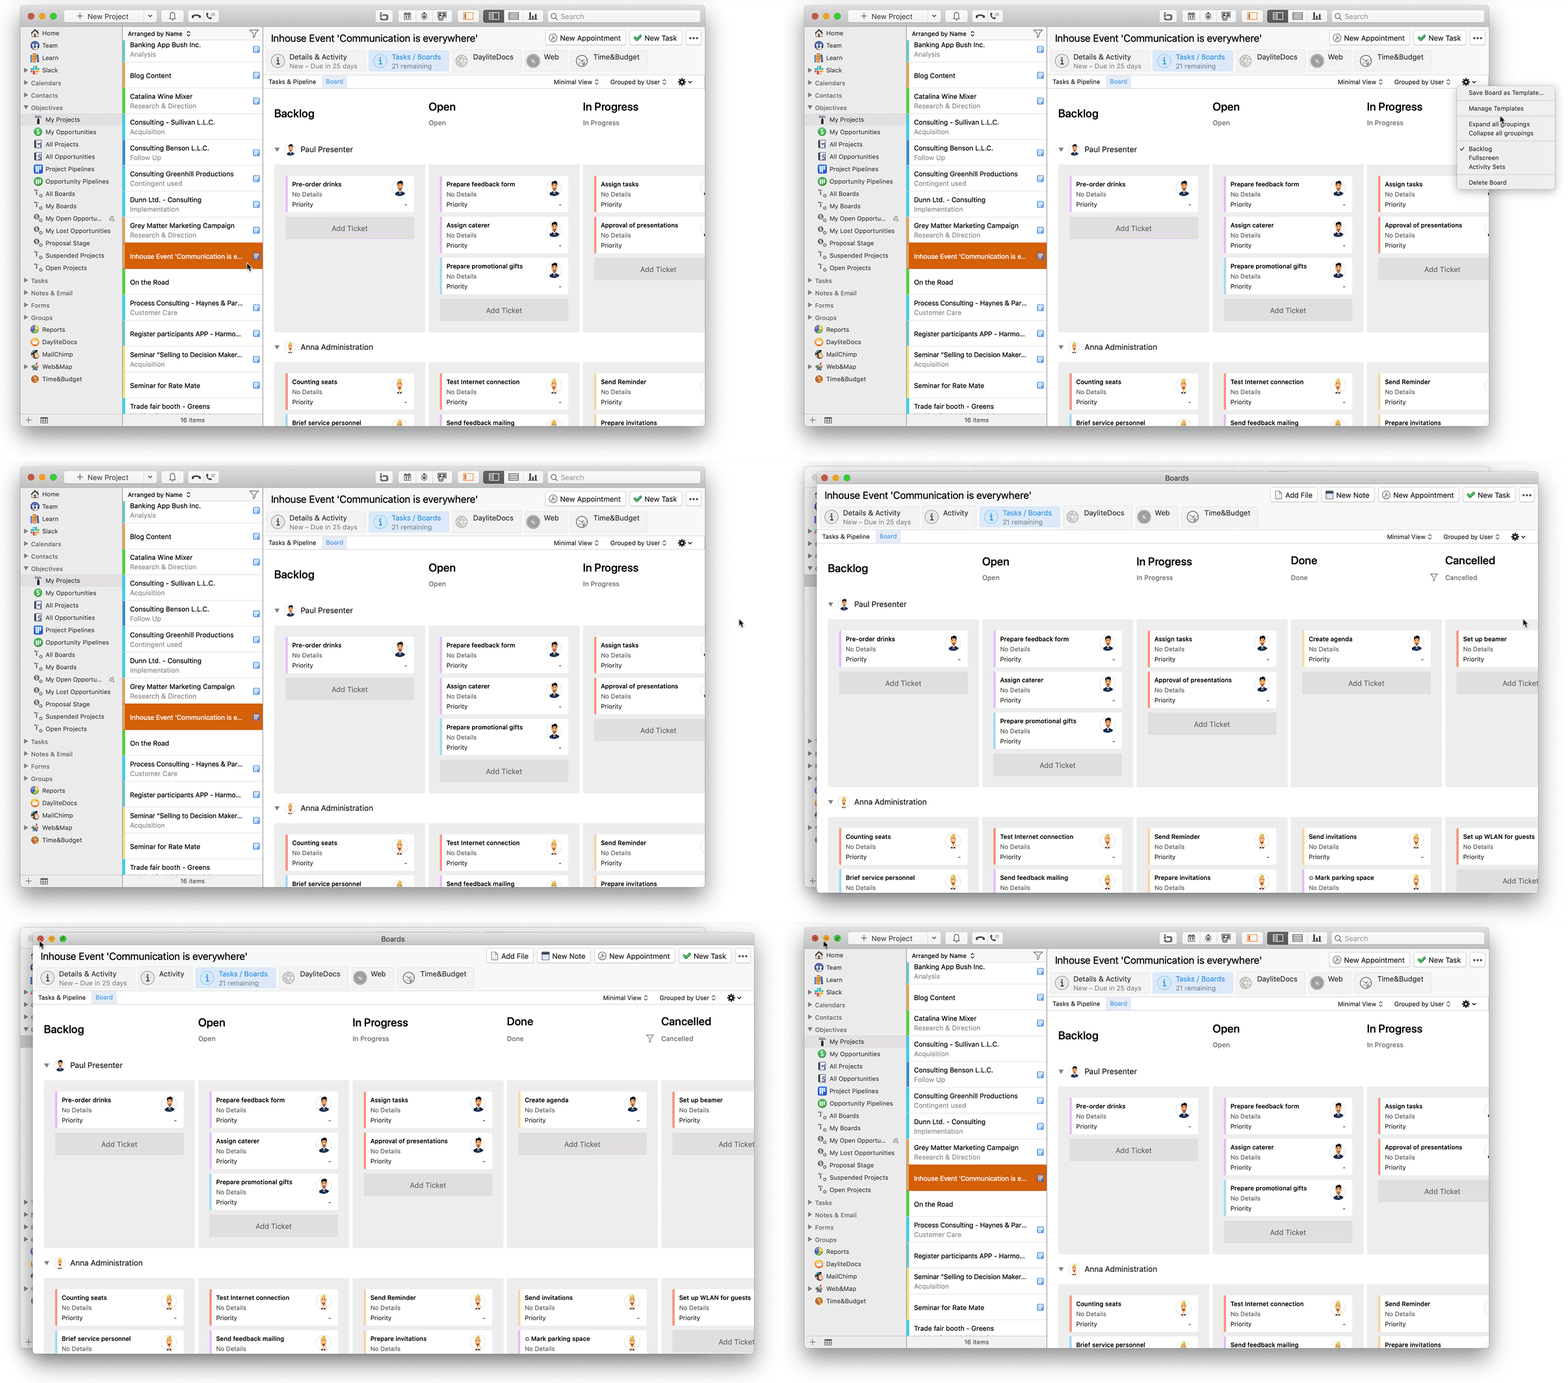
Show a board in full screen
- Open the desired project or opportunity (e.g. via the smart lists All Boards or My Boards under Objectives in the left sidebar)
- Choose the tab Tasks / Boards -> Board within the project or opportunity
- In the upper right-hand corner of the board, select the cog wheel
- Click at Fullscreen
The board will now open in a separate window in full screen mode.
Close full screen
Use one of these two options to close the full screen for your board:
- Click the red dot in the upper left-hand corner of the window to close the window
- Click on the grey area in your main Daylite window that shows Click to exit full screen
How do I know that a board has been created?
Create Kanban boards with the Daylite plugin Boards for your projects and opportunities to get better control over your project- and opportunity-related tasks (tickets). Use the visualization of your tickets and keep the overview.
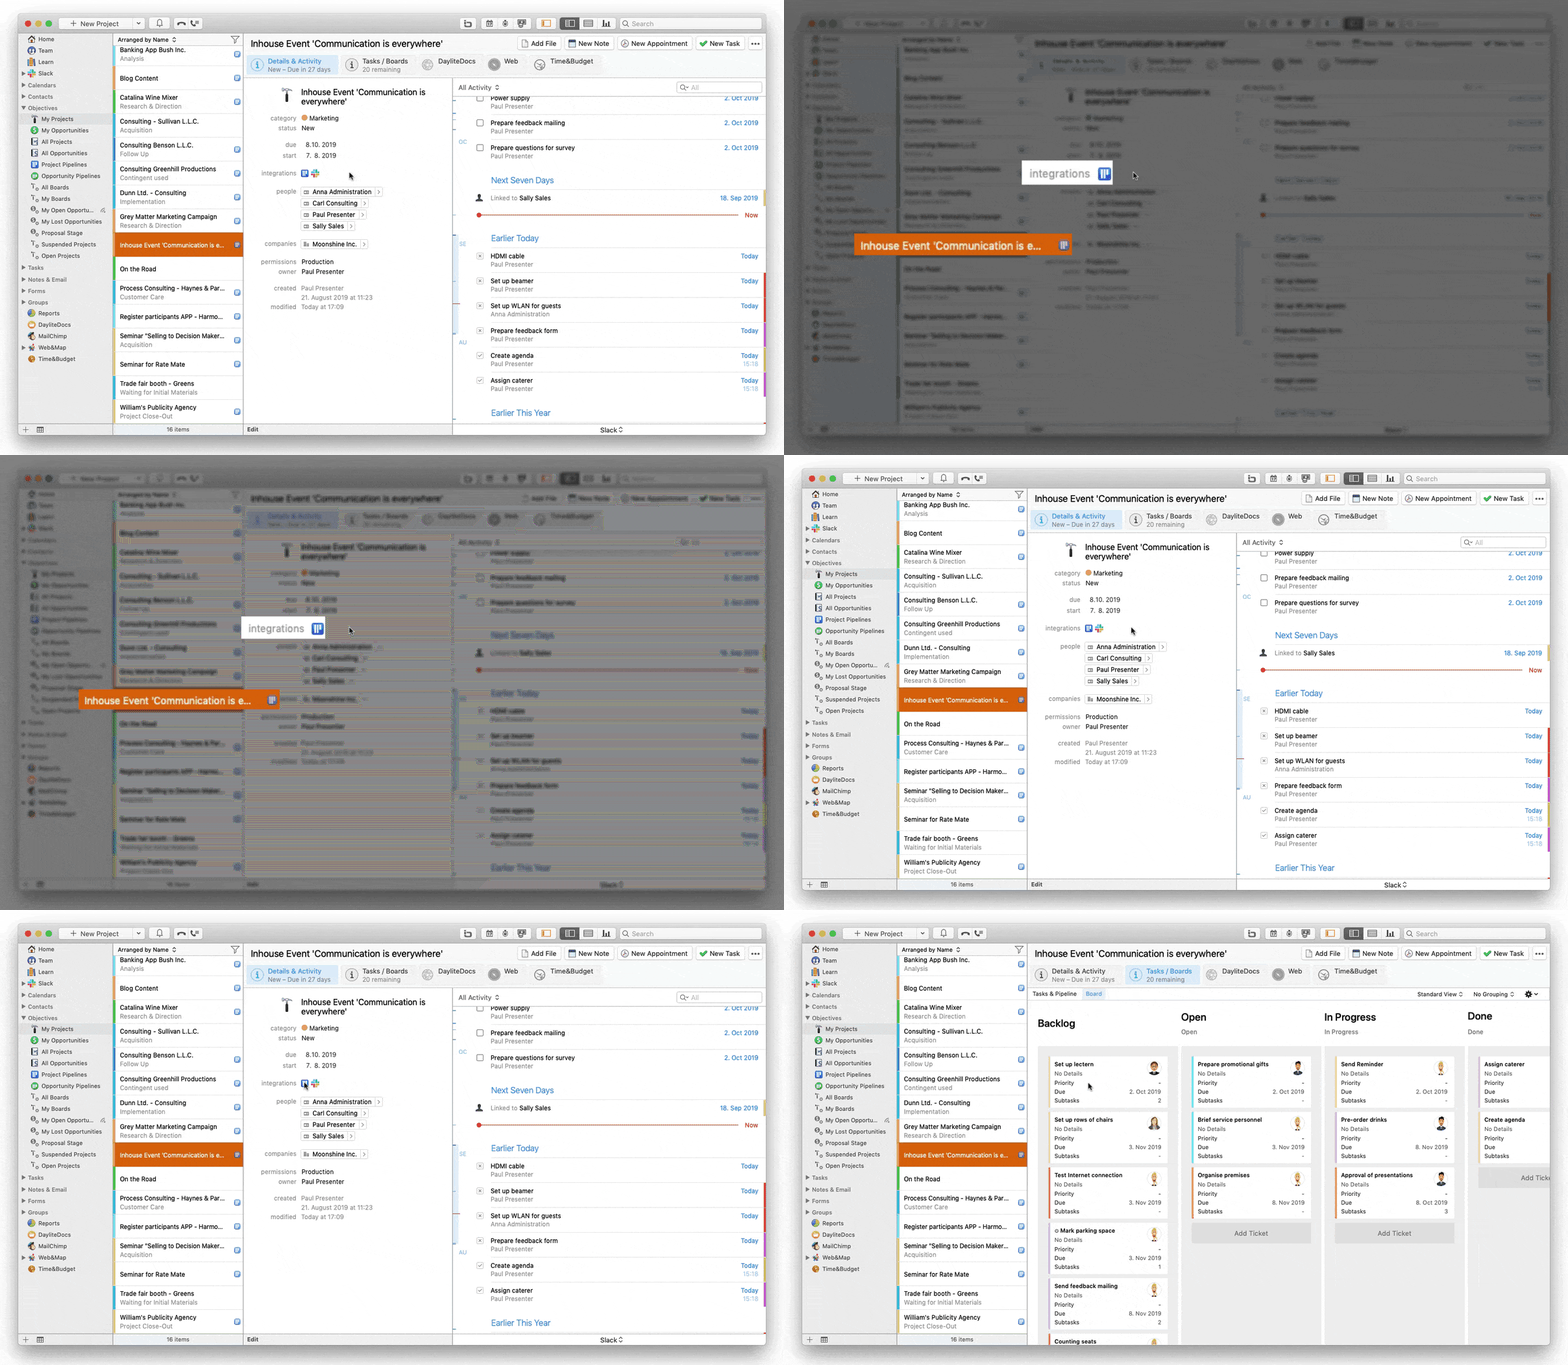
Whether a Kanban board has already been created for a project or opportunity is indicated by the board icon to the right of the object name. Additionally you will find the board symbol within the detail view of projects and opportunities in Daylite, shown at integrations.
If the symbol is colored, a board has already been created for this object. If the symbol is gray, no board has been created for the selected object yet. A click on the symbol takes you directly to the Board of the object.
Where can I get an overview of all boards?
Create Kanban boards with the Daylite plugin Boards to structure your projects and increase the efficiency of your project management by taking advantage of the visualization of your tickets.
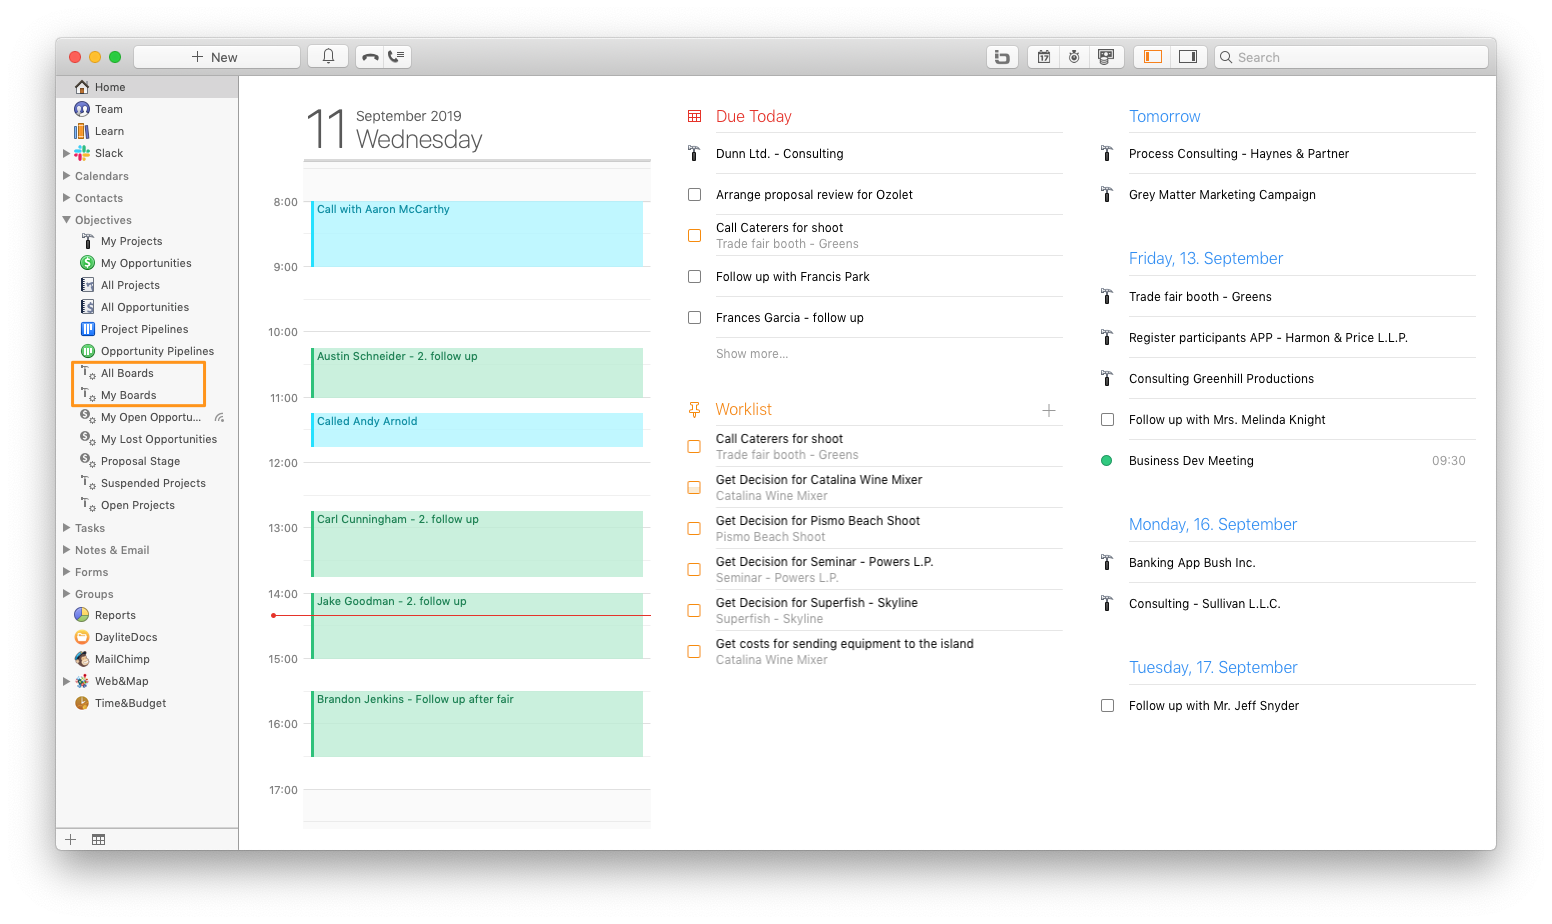
Once you have installed the Boards plugin, you'll find two automatically created smart lists in the Daylite sidebar on the left under Objectives. Please note that these smart lists will be recreated upon a Daylite restart in case they got deleted. These smart lists assist you in finding projects with existing boards easily.
Daylite smart lists for Boards
-
Smart list: All Boards
You'll see all active and inactive projects in Daylite, for which a board was created, regardless of the project owner. -
Smart list: My Boards
This smart list shows all active and inactive projects in Daylite that you own and for which a board has been created.